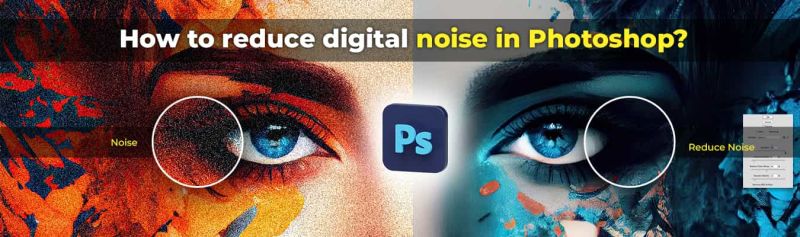
Digital noise, or simply noise, is the unwanted visual grain or specks that appear in photos. There are numerous causes of them, including:
- insufficient lighting
- high settings for ISO (the light sensitivity of your camera)
- long exposure times
- heat
that degrades an image’s quality. Image noise can also be created during photo editing.
How is noise different from blur?
Both noise and blur hamper the quality of your photos. But each of them occurs for different reasons and has its own effects.

Noise appears as dark and bright, or colored grains or specks across an image. It occurs when the exposure time is long, there isn’t enough light, or when you set the ISO of your camera too high. It can also happen when you click photos after zooming in too much (especially in poorly lit areas).
Meanwhile, blur is when parts of or the entire image aren’t sharp or clear. Generally, blurring happens when the camera shakes or the subject moves as the photo is being taken.
What are the different types of noise?
Digital noise is generally split into two types: color noise and luminance noise. It’s important that you know to tell the two apart before you set out to reduce it in your pictures. Let’s see what they are.

Chromatic noise
Chromatic, chrominance, or color noise is present when there is a distortion in the color. They can appear as out-of-place, specks of red, green, or blue in the image. It’s the type that appears in parts of photographs that are underexposed. These distortions can manifest as multiple colors instead of one single color.
Chrominance noise occurs when the sensors heat up. It tends to happen after long shooting sessions, like in the case of long exposure night photography or time-lapse photography.
Luminance noise
Overexposure and underexposure are the main causes of luminance noise, which typically manifests as grains in your image. However, here, you’ll find black, white, or gray dots, not colored specks. These dots are overexposed (white) or underexposed (black) pixels.
Many times, you cannot identify what type you’re dealing with. In such cases, you’ll need to zoom in to be able to tell the difference. Colored dots, or distortions, mean you are seeing color noise. Black, white, or gray dots mean you are looking at luminance noise.
How do you reduce digital noise in Photoshop?
So, you now know the types of digital noise and how to tell them apart. Let’s learn how exactly to fix each type.
Reducing chrominance noise
This one’s a fairly simple process and goes as follows:
Step 1: Use the ‘Reduce Noise’ filter
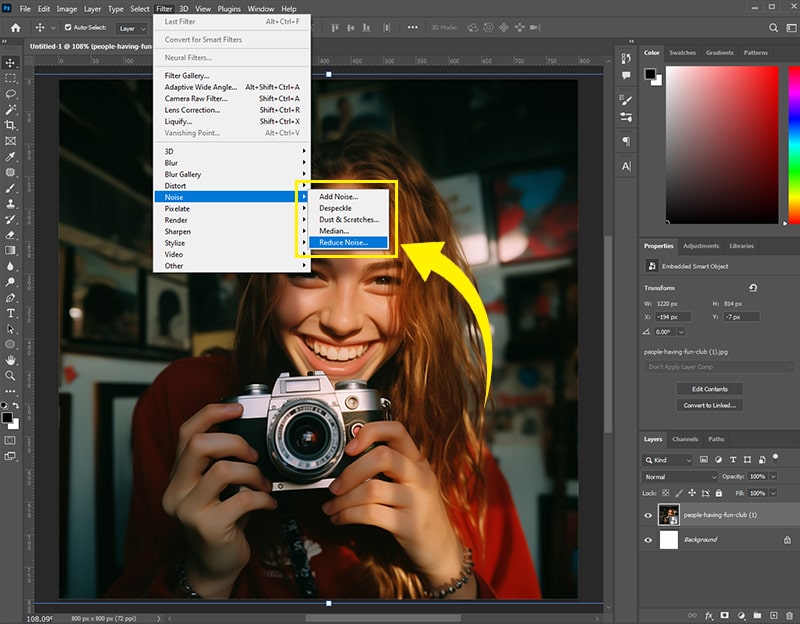
Open your photo in the editing software, go to the menu bar, and click on ‘Filter’. In the dropdown, click on ‘Noise’ and hover your mouse on the option to get a sub-dropdown. Here, you’ll notice there are options to ‘Add Noise’ and ‘Reduce Noise’. The first option is for when you want to add digital noise to your picture for a vintage look. Here, as our objective is to remove as much digital noise as possible, click on ‘Reduce Noise’.
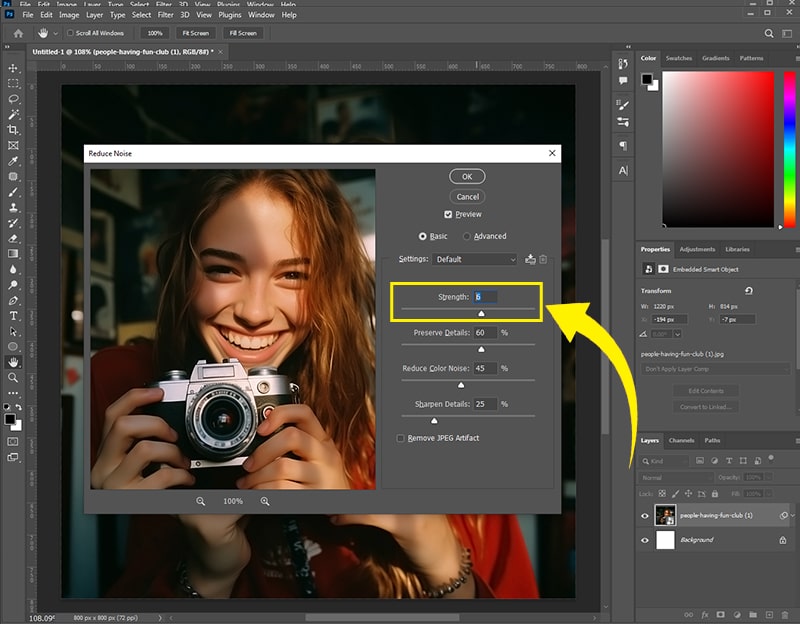
A new box opens up with the ‘Basic’ (default) sliders ‘Strength’, ‘Preserve Details’, ‘Reduce Color Noise’, and ‘Sharpen Details’. These sliders have pretty much the same function as their names suggest. The exception is ‘Strength’, which is for adjusting luminance noise. It also has a preview area, where you can see the results of your alterations in real-time.
The reduction process almost always leads to the blurring of photos. Therefore, the tool also gives you the ‘Preserve Details’ and ‘Sharpen Details’ sliders, which help you reach a balance between clarity and noise reduction.
Step 2: Reducing the color noise

To reduce the color or chromatic noise in an image, you’ll need to use the “Reduce Color Noise” slider. The scale on the slider is in percentages, going from 0 (left) to 100 (right).
By default, the slider is always on the extreme left (0%). Move the slider slowly to the right to make the noise blend in with the rest of the image.
If your photo is a JPEG, you can click on the ‘Remove JPEG Artifact’ box under the ‘Sharpen Details’ slider.
Pro tips:
- To compare the original photo and the edited one, click and hold the preview area of the box.
- Move the sliders in increments, or you’ll risk creating more noise.
If you’re happy with the result, click on ‘OK’ to apply the changes.
Reducing luminance noise
If you want the luminance noise reduction process to go well, you must take photographs with optimal focus settings and avoid lighting conditions that are harsh, like direct sunlight, flash.
There are a few different ways in which you can reduce luminance noise, but we’ll only look at two.
Option 1: Using the ‘Strength’ slider
While still in the ‘Basic’ mode, you can adjust the luminance noise by moving the ‘Strength’ slider slowly to the right.
To make more advanced tweaks, switch to the ‘Advanced’ option. Here, you can reduce the luminance noise in the red, blue, and green color channels one at a time.
The basic option is best for when you have noise all over your picture. Use the advanced option when the issue is with one more channel.
Adjust the ‘Preserve Details’ and ‘Sharpen Details’ sliders to restore some of the lost photo details. Again, do this gradually, or you’ll bring back the digital noise.
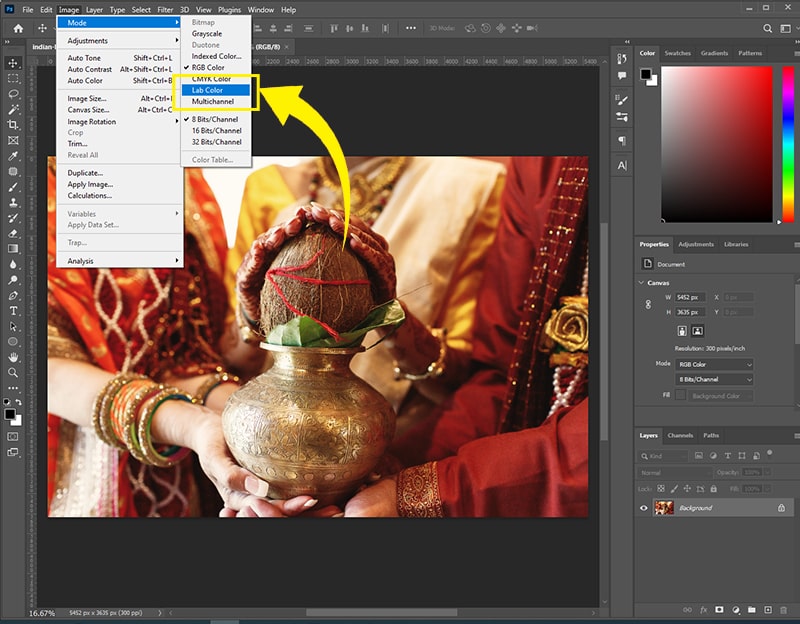
Option 2: Using Lab Color (this is more advanced)
Step 1: Change to the ‘Lab Color’ mode
After you’ve made the adjustments, click on ‘OK’.
You can change the mode to ‘Lab Color’ by clicking on the ‘Image’ option in the menu bar. After clicking on ‘Image’, you’ll get a dropdown. Hover your pointer over ‘Mode’ to produce another dropdown, and then click on ‘Lab Color’.
To the right side of the Photoshop window, in the ‘Channels’ palette (next to ‘Layers’), you’ll see the ‘Lightness’ channel’s ‘a’ and ‘b’ instead of the RGB channel’s red, green, and blue.
In the ‘Lightness’ channel, you’ll see details about your picture’s black and white values (luminance). Under ‘a’, you’ll find magenta and green, while yellow and blue come under ‘b’.
Step 2: Make a fresh layer
Now that you’re in Lab Color mode, create a new layer to place on top of your image. Henceforth, you’ll be editing this new layer, so that the original photo remains unaffected by all the changes.
Pro tip: Always name your layers to keep track of what and where they are.
Step 3: Open the ‘Lightness’ channel
Once you have your new layer, open up the ‘Lightness’ channel on the right side of the window. You’ll want to use this to reduce the luminance noise in your photographs.
Step 4: Make a new ‘Lightness’ channel
Create a fresh new ‘Lightness’ channel for pretty much the same reason as creating a new layer- ensuring that the original photo stays unaffected. Rename the channel to avoid any confusion.
Step 5: Add the ‘Glowing Edges’ effect
Go to ‘Filter’ in the menu bar and click on ‘Filter Gallery’, then again on ‘Stylize’. Select ‘Glowing Edges’ and all edges in your image will appear white. All smooth surfaces, on the other hand, will appear black.
In the dialogue box that appears, you can adjust the selection by tweaking with ‘Edge Width’, as it deals with the width of the white, selected areas. Keep the ‘Edge Width’ low if the image details are on the finer side.
Set the brightness of the selected areas with ‘Edge Brightness’. And, with ‘Smoothness’, you can blur the white areas so as to avoid highlighting the noise.
Step 6: Invert the new channel
After you’ve made the above adjustments to the new channel, you’ll need to invert it. To do this, click on ‘Image’, hover your pointer over ‘Adjustments’, and click ‘Invert’. Press and hold ‘Ctrl’ on your keyboard (‘Command’ for Mac) and click on the new channel. Now you’ll see that only the white areas are selected.
Step 7: Blur the selected areas
Now that all the white areas have been selected, you’ll need to blur them out. Go to ‘Filter’, hover over the ‘Blur’ option, and click on ‘Smart Blur’. You’ll get a new dialogue box, where you should increase the ‘Quality’ to high and lower the value for ‘Radius’ to avoid excess blurring.
To control the extent or range of the blur, use a value of around 10 for ‘Threshold’ to prevent damage to the details in the image.
Step 8: Adjust layer opacity
After applying the blur effect to your layer, go to the ride-side of the window and into the ‘Layers’ palette. Here, adjust the opacity of the edited layer and the original one so the overall image matches your preference.
Step 9: Flatten the image
All the adjustments are now done, and your picture is ready for the final step- flattening. Go to the menu bar, click on ‘Layer’, go down the dropdown to ‘Flatten Image’, and click it. All your layers will be flattened into a single background image.
If you have turned the visibility off for any of the layers, you’ll get this warning:
It means that all invisible layers will be discarded, and only the visible layers will affect the final image.
Flattening compresses all the layers into a single image, reducing the file size and making it faster to print. Others are also prevented from making changes to your photos to resell them as their own work.
Why is it important to remove noise from images?
We just went through all the steps on how to reduce digital noise in photographs. But is it an absolutely important part of photo editing? During our many years as photo editors, we’ve often come across many ‘noisy’ images. It’s particularly prominent in photos that are taken in low-light conditions, when the ISO is set too high, or when the photographer clicks pictures after zooming in too much (in low-light).
Digital noise is, in many cases, immediately apparent. In other instances, the random speckles become noticeable only after a few zooms. In any case, the appearance of this graininess degrades the quality and clarity of an image; which is a real shame if there aren’t more shots of the same subject.
Furthermore, it’s quite difficult to edit photos that have a lot of noise. It would be like doing photo editing with the difficulty set to ‘Hard’.
So, yes. It’s definitely important to remove as much noise as possible from your photographs. For one, its removal will make the images clearer. Furthermore, noise reduction smooths the photo editing process.
But, remember not to overdo the reduction, as it can compromise the image clarity. Balance out noise reduction and image clarity, and you’ll get good-looking photos at the end.
Christa Elrod 


Christa Elrod serves as a senior graphic designer at ProGlobalBusinessSolutions. She is a creative designer with robust skills in typography, UI/UX designs, printing designs, video post-production, and 3D designs. Possessing years of experience across diverse industries, Christa loves to educate fellow designers with her experience and domain knowledge.