Portrait retouching is obviously a great way to improve your portrait photography. But there should be proper care to make sure that things are not overdone and the image face seems unnatural. There are a lot of tools and techniques for working on the snaps taken.
Some of the times colors and details will have to be separated and frequency separation is the technique used for this. By using the said technique, you can fix all the issues like blemishes, under eye bags and wrinkles. In this, your image is divided into two distinct frequency layers- a great frequency digital element with details of image and a low frequency element containing the information related to colors and tones. The best thing about frequency separation retouching in Photoshop is that these corrections can be made without fluctuation in the skin’s natural texture.
What Is Frequency Separation?
Frequency separation is one of the most commonly applied Photoshop processes used to separate high-frequency or low-frequency information without disturbing other areas. Notably, high-frequency information includes finer details such a pore, textures, hair, skin imperfections, and fine lines. Low-frequency information carries details with regard to colors, shadows, and tones.
When you segregate high-frequency and low-frequency information into separate layers, you are able to retouch one layer without having to affect the other layers. For example, you can refine skin textures while retaining the original color tone. Similarly, you can retain skin texture while being able to lighten shadows. The process promotes an efficient and smoother skin retouching impact.
Enhancing your portrait images finds no better way than portrait retouching. Let us see how the whole process proceeds using Photoshop software.
Setting up before initiating frequency separation technique in photoshop
You should create two copies for the image background layer. The first layer can be labelled as color while the second layer can be named detail. Former is meant to be the low frequency layer while the latter will serve as high frequency layer.
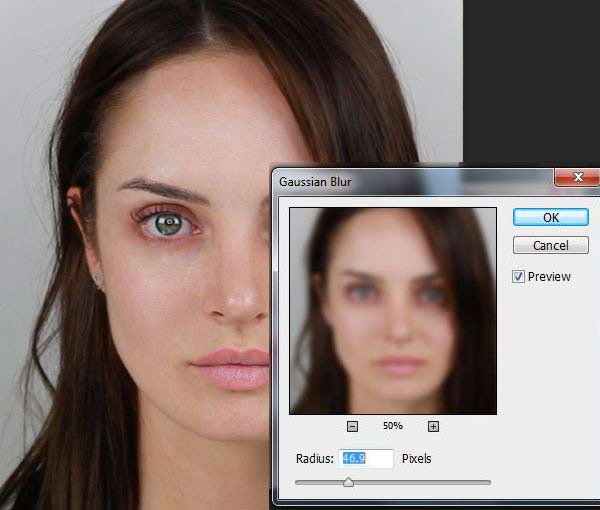
Choose color layer and turn off your detail layer. Apply Gaussian Blur so that it blurs the entire image details while retaining the features intact. The setting can fluctuate and depends a lot on image size.
Now select the detail layer and then navigate to the Apply Image section. Adjust the setting based on the depth of color you are using. Tweak the detail layer blending mode to Linear Light. Then, a layer group should be created followed by dragging the details and color layers to a new layer group.
Once this set up is done, let the portrait retouching Photoshop do the rest of things with ease. Now, it’s the time to start retouching.
Touching up the color layer
By this, you have to balance out the whole color tones; removing the light and dark areas is the major task involved.

Clone tool helps to equalize the color tones and you can experiment using various blending modes. Color layer can be subjected to Lighten, Normal and Darken modes to avail some effects. However, adjusting the opacity of blending modes may be needed. Burn and Dodge tools can also be helpful. There can be ‘n’ other ways and you need not to hesitate to experiment.
Touching up the Detail layer
Detail layer has every detail of the image and numerous tools are there to fix imperfection of skin like acne and wrinkles etc.
Also, check how to retouch mature skin in Photoshop
Clone tool of Photoshop can come handy. You can sample an area from desired image section and paint it over the area that has issues. Healing Brush tool also samples textures from any of the desired nearby areas for making a flawless patch. Spot healing brush, on the other hand, has the capability to automatically clone an area for repairing imperfection.
Other important tools that can be used are Path tool and Content-Aware Patch.

Once the retouching of two layers is done, you can simply exit the layer group for reviewing the work done. Since the entire retouching was done on two newly created layers, the process is absolutely non-destructive. So, you can retry if the first attempt fails to please you.
Else if you want an external party to carry out the task on your behalf, get in touch with a professional photo retouching company having enough experience and great expertise in offering professional portrait retouching services.