Photographing a white product on a white background is one of the biggest challenges in eCommerce product photography. In high-end product photography, careful metering and light positioning are needed so that neither the background nor the product is overexposed. You also need to precisely define the shape and depth of the products with the help of shadows.
Well, this may seem daunting. However, it isn’t an impossible task. Applying the technique does have a certain learning curve but that should stop you from learning, right? White product backdrops are fairly standardized among top marketplace like eBay and Amazon. It’s because white can reveal the true color of the products and won’t distract the attention of potential customers. This increases the chances of products being sold faster than that would on a patterned or color background.
In this article, we will help you to photograph white products that will need minimal editing and can be readily used in ecommerce sites. You will learn how to retain the details and avoid incorrect exposure in the images. We have also mentioned a few product photography tips and tricks in between. So, make sure to go through each section carefully to photograph white products the right way. Now, let’s get started.
The guidelines we have mentioned here don’t need to be followed as it is. Once you become familiar with the shooting process and the use of materials, applying the technique will be easier.
The technique shall act as a good starting point for photographing white products on white backgrounds. So, make sure you make use of it. To make the work seem less tedious, you should start enjoying molding or shaping the light. Take some time to learn how lighting works even if you have mastered studio lighting.
If you still fail to perfect it, then we suggest editing the same. For that, you can reach out to us! We, at ProGlobalBusinessSolutions, are a professional company and offer the best-in-class photo retouching services in the industry. For more details on our services reach our website.
-
White-on-White Camera Settings
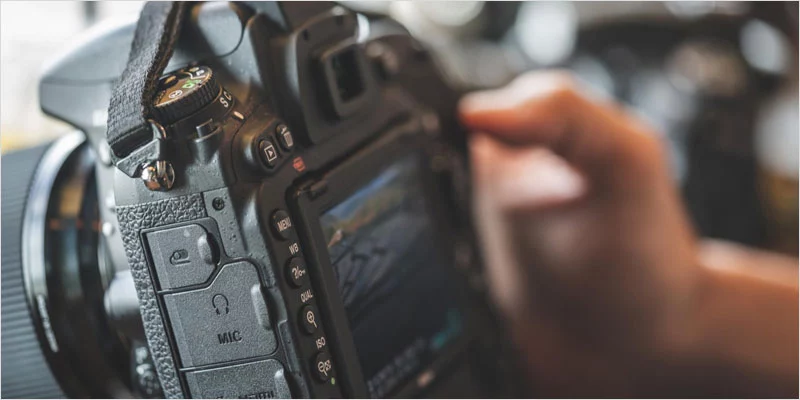
It’s always good to start with the basics. So, carefully set the white balance as per the shooting environment or light source. It’s a very important step and must not be skipped. Otherwise, your white products will have an orange and blue cast. Similarly, if you don’t want your images to appear grainy, you should set the ISO to 100 or 200 and use a tripod.
Also, make sure to arrange your manual camera settings in a way that suits your products. For example, if there’s a product in focus, you can get excellent detailing for most if not all by shooting at f/16. However, if you wish to get a softer effect, then it is advisable to use a wider aperture.
-
White-on-White Photo Studio Setup
Another thing that may come to your mind is how to separate the white product from the white background. If you’re thinking to light up the white product just like you do with the colored products, then it is likely to lose important details.
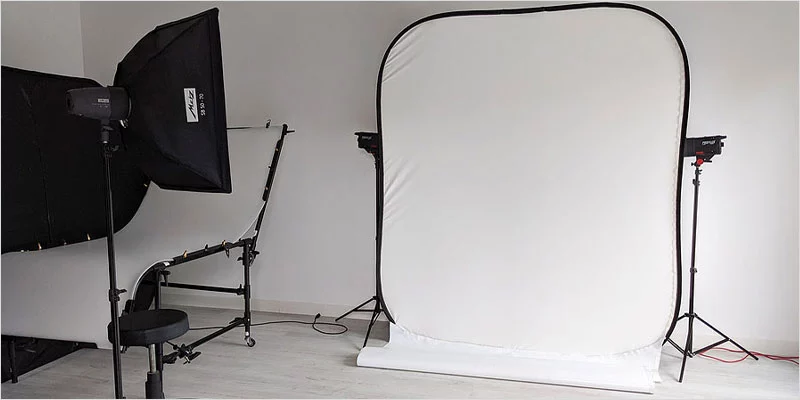
So, here’s what you can do. Start by placing the product on a flat table or any other elevated surface. The next thing you need is a white reflective surface to place behind or beneath the product.
When it comes to choosing the white reflective surface, you’ll have a few choices like white foam core board, white plexiglass, or white seamless paper. You can make a choice depending on whether you need to see the reflection of the product or not. As compared to other reflective surfaces, we suggest using a white foam core board as it is cheaper and maneuverable.
For this setup, you will have to do two things, i.e., set up the product on the top of one board and prop another one behind it. After that, you can line up the edges of both pieces. One tip is to use 4-5 boards instead of only 2 so that you can surround the product. However, you should leave some space near the window for the light to shine and camera shooting to take place.
You don’t need to worry about the size of the boards. Just buy something that will leave you enough white space for cropping around the product. Once you are done with this arrangement, you can start molding the light around the product for creating a clear separation between the background, the white space, and the product.
-
White-on-White Photography Lighting
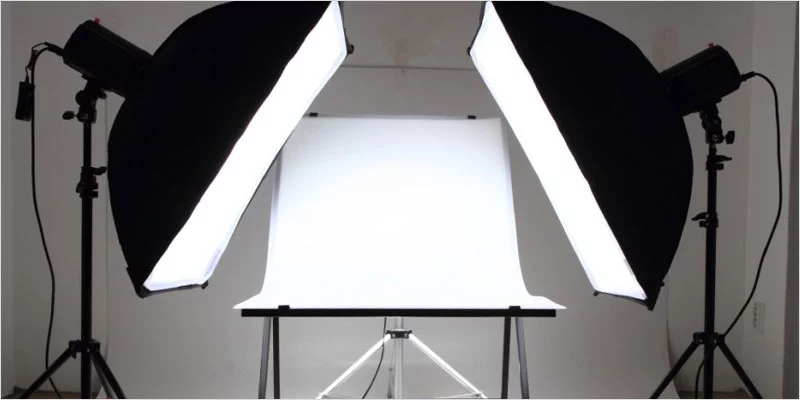
The quality of white-on-white product images will be determined by how well you can manipulate the light. By accurately shaping the light, you’ll be able to separate the white foam board from the white product and add depth to the image. Adding depth will also help you to showcase the item’s unique shape and texture.
There’s another thing you need to remember, i.e., the broader the light case, the better as it can help in avoiding vignetting. So, it doesn’t matter whether you use strobe or continuous lighting, there won’t be a problem as long as you make it broader.
Also, you shouldn’t put light on the white products directly like you do while creating shadows for any other product. Instead, use indirect lighting to create shadows with definition. You can also position the light source slightly above or behind the camera. Now, move the product closer to the camera and away from the background until the product falls into the shadow. Finally, take the test shot.
You can use the test image as a reference for making further adjustments in the lighting. Your main aim should be to make the background as white as possible. But make sure that you don’t let in so much light that the product’s edges are lost. The white-on-white photography will have good separation between the product and background but the product may appear too dark.
However, don’t fret! There’s a variety of ways to fix the darkness of the product while adding extra lighting. Here’s what they are.
- Adding more white fill cards or foam core can offer more control. If you’re not too serious about power, distance, and light source meters, you can try this method. White foam boards and fill cards are easier to move around and you can witness the light change on the object. It will help you decide where to put the card for creating the needed depth and illumination.
- Take a test shot by moving the board or card to the product’s side. By doing this, you’ll notice that the additional reflected light will create a shadowy depth while illuminating the product even better. Besides, you’ll also notice that the exposure of the white product is improving, and the white product background is getting lighter.
- Depending on the intensity of your light source(s), you may need to move the board or card further away from the product to create your desired light fill and exposure. Our product is still underexposed and is not showing much detail. This is an easy problem to solve. We have positioned our foam board on the product’s left side. Now, all we need to do is use the same process to add light fill to the other side of the product. Add a foam board or fill card to the other side of the product, moving it close to the product for fewer shadows or farther from the product to create more shadows.
- If you’re planning to adjust the lighting to your preference, you need to keep a few basic lighting principles in mind. The first principle is not to overexpose the products. It will result in losing texture and other details that can make a product look unique. Similarly, you shouldn’t be underexposing the products as it can also compromise the details and make the product look unappealing. Once you’re done with the adjustments, you can take the test shot.
- By now, you will have a product photo that is perfectly lit. However, if you still see that the product is a bit dark or has an unnatural color cast, then you can try out another thing. Just take a small strip of white paper or white foam core and put it under the lens of your camera while facing your product. It will lighten the front of the product. Now, the product will appear brighter, product edges will be visible, and details will be more noticeable.
At this point, you’ll be having a white box around your product. You might have already heard of using a product tent or product box for creating a similar type of imagery. Using tents and lightboxes does work but you have to use several lights in the entire setup. Unlike here, where we only bounced off the light using foam core for illuminating the product. Besides, you will also spend more time adjusting the distances between the products and lights, experimenting with the light modifiers, and tweaking the power settings of the lights.
No matter whether you choose the foam core board or the lightbox or tent method, both processes can provide you with high-quality white-on-white product images if the shooting and editing are done right.
-
White-on-White Photo Retouching
Once you’ve perfected lighting and captured the pictures, you need to cull the best images and remove their background. For this, you can use photo editing tool you’re comfortable with.
Now, depending on the lighting you chose for your product, you will either deal with soft or relatively bold shadows. It’s always a good thing to remove the shadows during the product photo retouching rather than flattening the photo in the camera by adding more lighting.
If you’re good with image masking, removing shadows will be easier. However, if you don’t know how to mask, then it’s better to hire an eCommerce photo editing services company offering background removal services. Either way, make sure that the final image looks polished and is perfectly exposed.