The success of your promotional campaign is largely dependent on the quality of product images that you use for attracting prospects. To add commercial value to images, they have to be professionally retouched to ensure that their resolution is optimum and excellent quality prints can be taken.
Adode Photoshop is the industry standard software for retouching images. By leveraging the tools and techniques used by professional artists, you too can pull off similar effects on images captured by you.
Over here, the proven ways to retouch your product shots in Photoshop would be discussed to help you carry out the same with ease. An example of a glass product is taken to understand ways to retouch images that pose challenges. But, before that, let us begin with understanding the concept first.
What is Product Photo Retouching?
Photo retouching is an important step for creating compelling product portfolios for website showcases. It involves light adjustments, managing gear, pre-production processes and much more. You cannot limit image production to shooting a photograph of the model donning the apparel or displaying a product; this is merely a basic step. There are plenty of important steps to follow including the most important photo editing process that can eventually provide the perfect image. For high image quality, all the imperfections and distractions in the photograph should be eliminated. With proper techniques for processing product photos with Photoshop, you can exclude all such flaws to come up with attractive and flawless images.
Tips to edit eCommerce Product Photos in Photoshop
Here we will discuss how to edit your product photos in Photoshop to make them suitable for websites and other marketing activities using various steps that will guide you to bring out the best version of your product(s).
-
Isolate the Product
When it comes to photo editing, isolating the subject is the thumb rule to have a clear and distraction-free look at the things.
The backgrounds are constantly tweaked or removed when it comes to ecommerce. Hence, during the photo shoot, the products are clicked on the white background so that later in the post-processing process, they can easily be removed, or if the white background is used (in e-commerce giants), then it should be in a seamless way that helps in getting the maximum attention on the product.
Apart from the above reasons, isolating the product from the background also helps in changing the color of the background as per the need, and it also reduces the file size and allows the website page to load faster.
There are many photo editing software that are helping both beginners and professional photo editors in winning the game of eCommerce photo editing
-
Make your Product Realistic
While isolating the product has its importance, the other significant idea that can make your product look more realistic and attractive is to give some shadows and space while editing to make it look real to life and your audience make the purchasing decision just by looking at the product picture.
There are three types of shadows that professional photo editor’s use-
- The Natural Shadow: Cast by placing the product under the direct sun.
- The Drop Shadow: Cast by placing the product above with direct sunlight shining down on it.
- The Reflection Shadow: Cast by placing the product on a reflective surface.
-
Remove the Negative Spaces
One of the significant factors that must be considered while preparing the product/s to look attractive is to remove the negative spaces from the image or crop those parts that are creating some distraction and affecting the product’s credibility.
Apart from the above, the primary reason for cropping is to keep the image’s size and shape consistent. You will not like keeping different size images on display as it will look unprofessional and messy.
-
Use Real-Life Colors
The usage of appropriate colors in your product images is a point that all professional eCommerce product photo editing services must take into consideration because your audience and customers want to view the product in a way that it looks in actual shopping stores. Hence many eCommerce websites use terms like ‘True to Color’ to give a hint to their customers that whatever the color they are seeing is the product’s real color.
This has reduced the number of return orders as the customers are satisfied that the color of the product/s they saw on the website matches what they received. It has become common to use natural or original colors in product photos.
-
Image Consistency by Batch Photo Editing
When you decided to make your ecommerce website a successful one, always try to maintain image consistency by taking the help of batch photo editing. Some photo editing software like Photoshop and Lightroom helps photo editors create a positive user experience by editing the images in batches.
This process helps in managing the bulk work but also helps in adjusting various parameters like image colors, contrast, white balance and more.
-
Improve the Visual Perception
It often happens during a photo shoot of the product that the image’s composition is ruined, which changes the whole look and feel. Here you need to reshape the images in such a way that helps in improving the visual perception without compromising the quality.
To achieve symmetry, you need to push or pull specific pixels that bring out the best version of the photo that will use in your ecommerce platform.
-
Always Use Ghost Mannequin Effect
Another major to-do while you prepare your photos to launch on the ecommerce website is removing the mannequins hindering your product. We understand how vital a mannequin is to present your apparel, jewelry, etc. But it sometimes distracts the customers from the product you want their eyes on.
Here, you can make good use of the ghost mannequin effect; in this effect, your product will be visible on the mannequin, but the mannequin itself is not visible, which helps in reaching the next level of professionalism.
-
Photo Optimization
Before you launch your product images on the ecommerce website, ensure it is fully optimized, and all the defects are removed so that your customers look at the clean and professional image/s of the product you want them to purchase.
While optimizing your image, ensure that the files are not large- this may impact the website load speed, and resolutions are correct- this gives a more professional feel to the picture; always check the dimensions- to fit the image frame perfectly.
Step-by-Step Guide to Retouch Product Photos in Photoshop
Lighting and photographing glass products are a tough task. This is because incident light gets reflected and refracted from the surface in unmanageable proportions which present difficulty in retouching.
Photoshop, however, offers the tools needed for adjusting, correcting, improving and enhancing the images convincingly. The lighting exposure can be improved and specks, as well as color casts, can be eliminated for achieving impeccable results.
Let us now learn the steps through which you can retouch images with Photoshop for achieving immaculate outcomes.
1) New Layer Creation

- Open Photoshop and then open the product image on its canvas
- Navigate to Layers palette
- Get the original layer duplicated
- Press Ctrl or right click on the Background layer
- Select the Duplicate layer
- Get the new layer renamed to ‘Image Correction’
2) Image Cropping
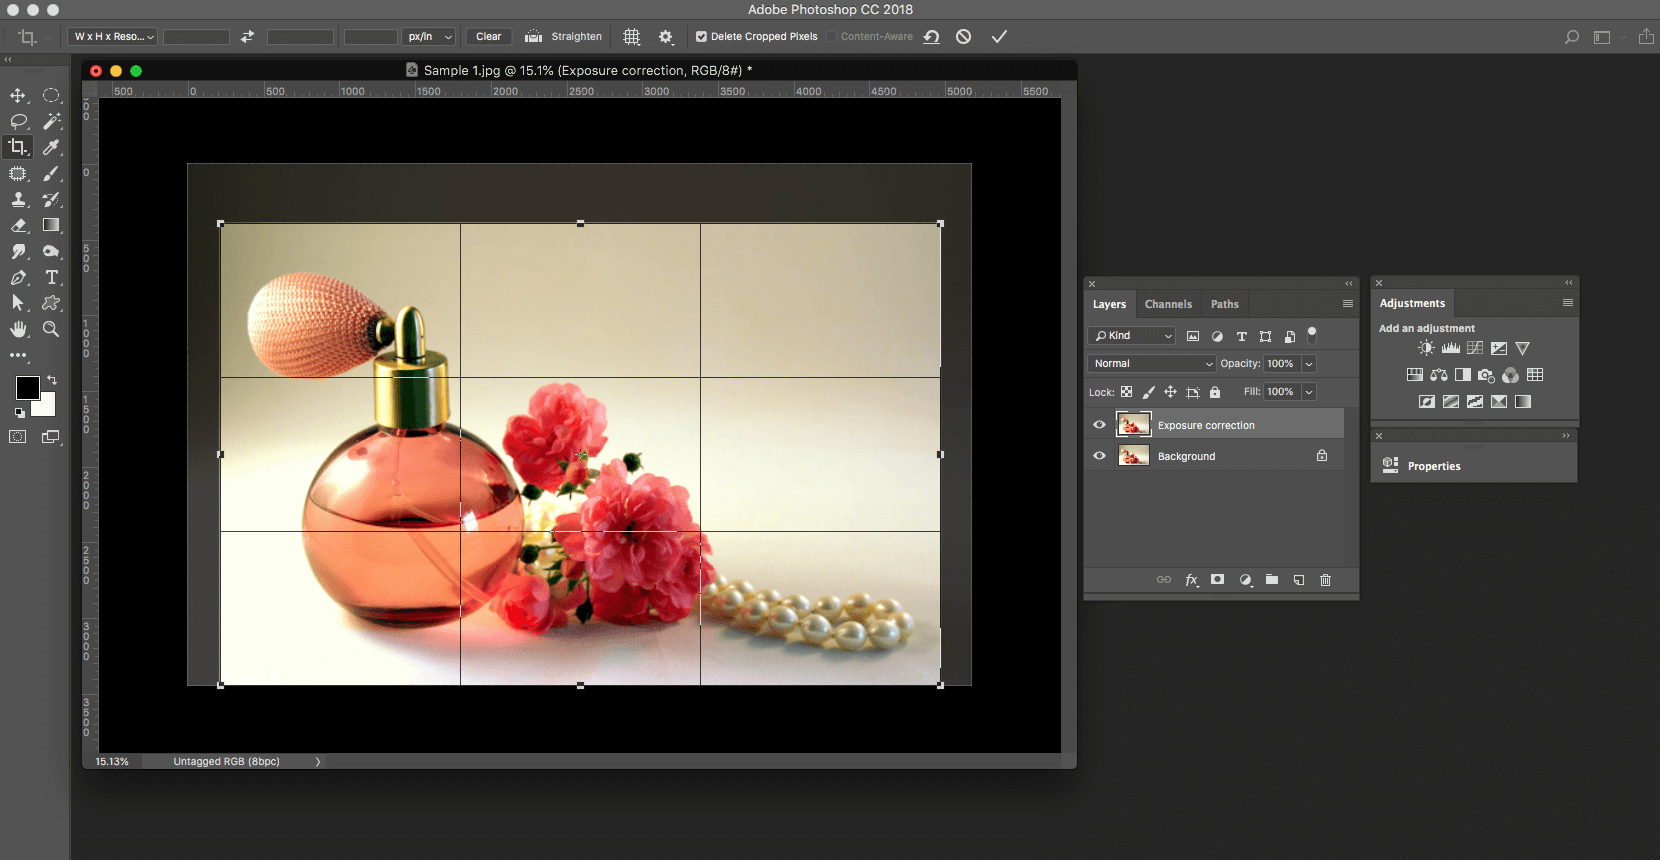
- Move the cursor to the Tools bar for selecting ‘Crop’ tool
- After clicking on image’s top corner, drag the crop cursor to bottom corner in a diagonal manner
- The crop cursor at opposite bottom corner is now to be pulled up to crop out the edges
- Keep the Shift Key pressed to maintain the basic proportions
- Crop unless you find that the product image is properly positioned in the frame
3) Level Adjustment
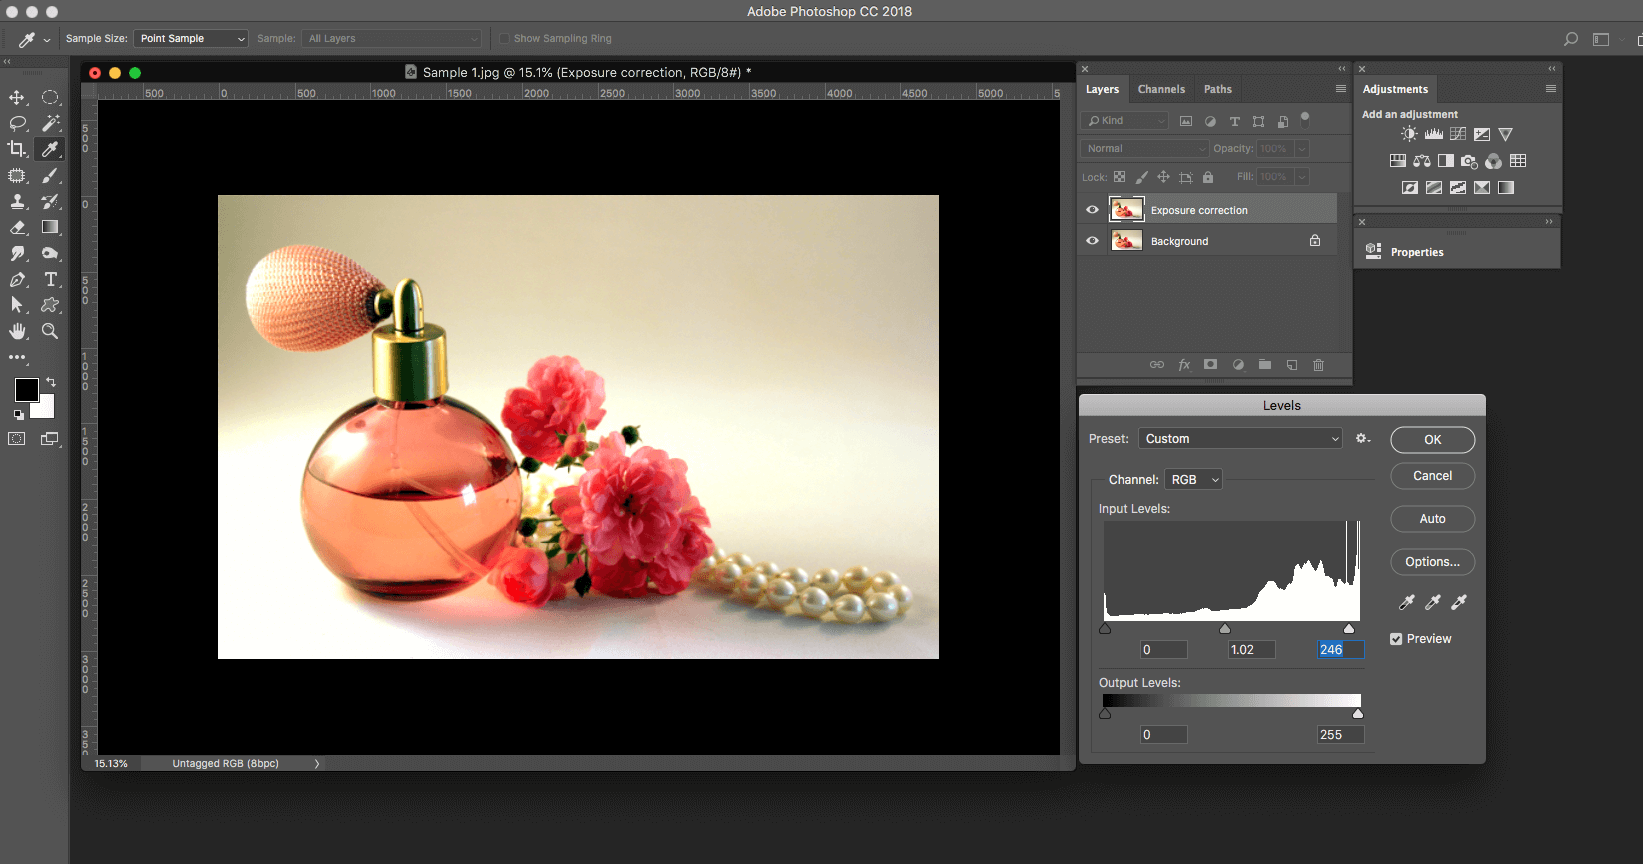
- Navigate through Images menu to arrive at Adjustments and then choose Levels
- The Levels adjustment layer is opened
- For correcting image exposure, pull in the histogram’s left-hand side’s slider (Highlights)
- Move up the mountainous gradient to more height
- To give a striking contrast, the midpoint or greys slider needs to be moved
4) Cleaning the Image up
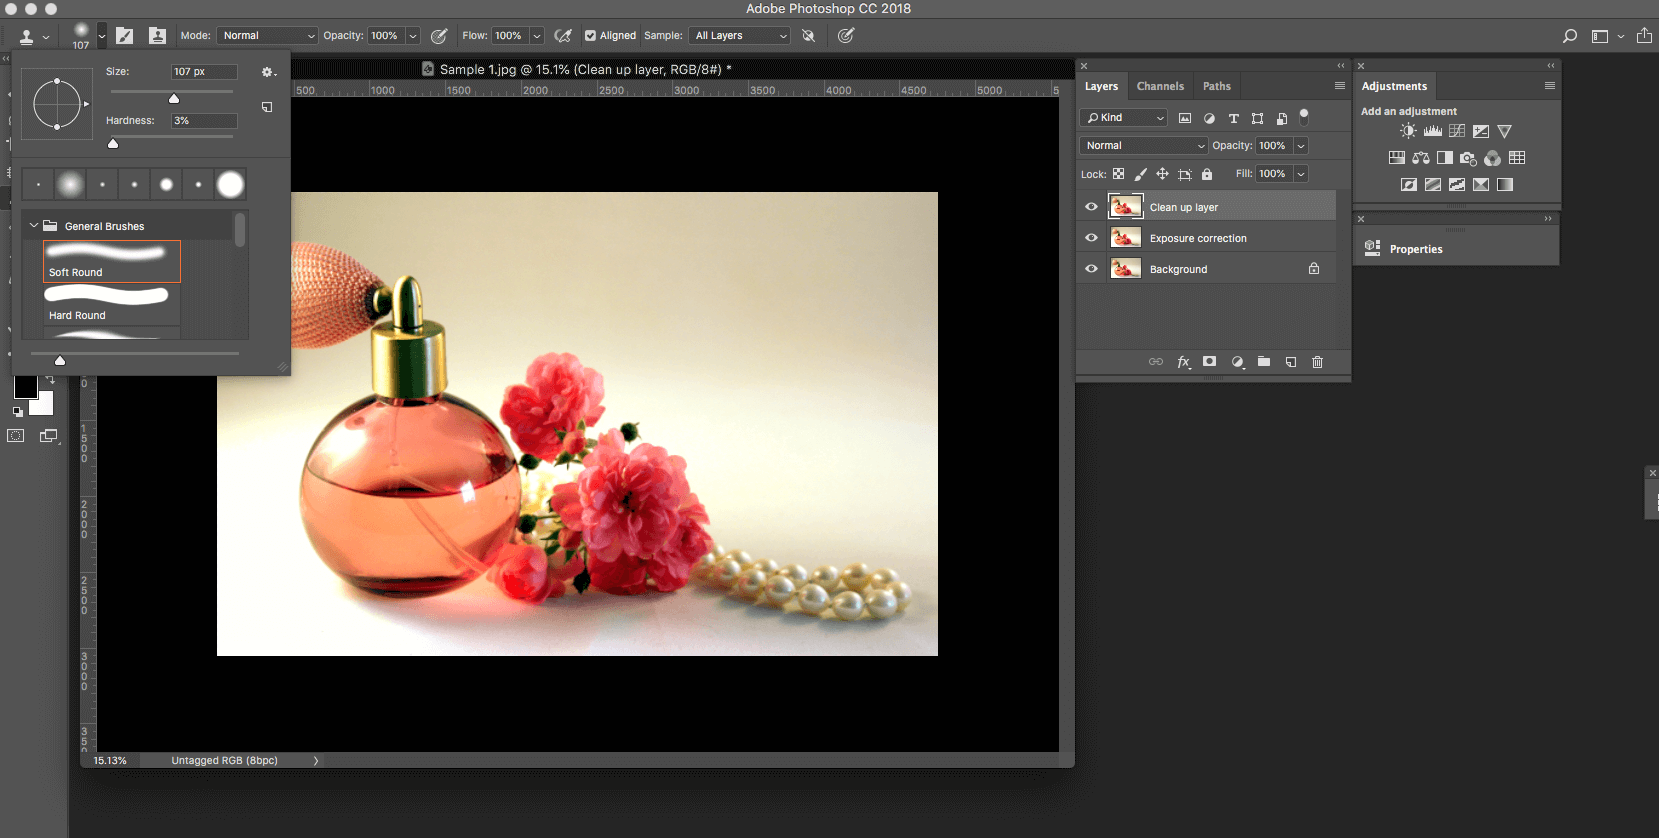
- Start by creating a new layer and name it ‘Image Clean-up’
- Choose the Clone Stamp Tool from Tools bar
- Choose soft edges for Brush from settings and keep the size as small as dust specks
- The Opacity should be 100%
5) Clone the Image Out
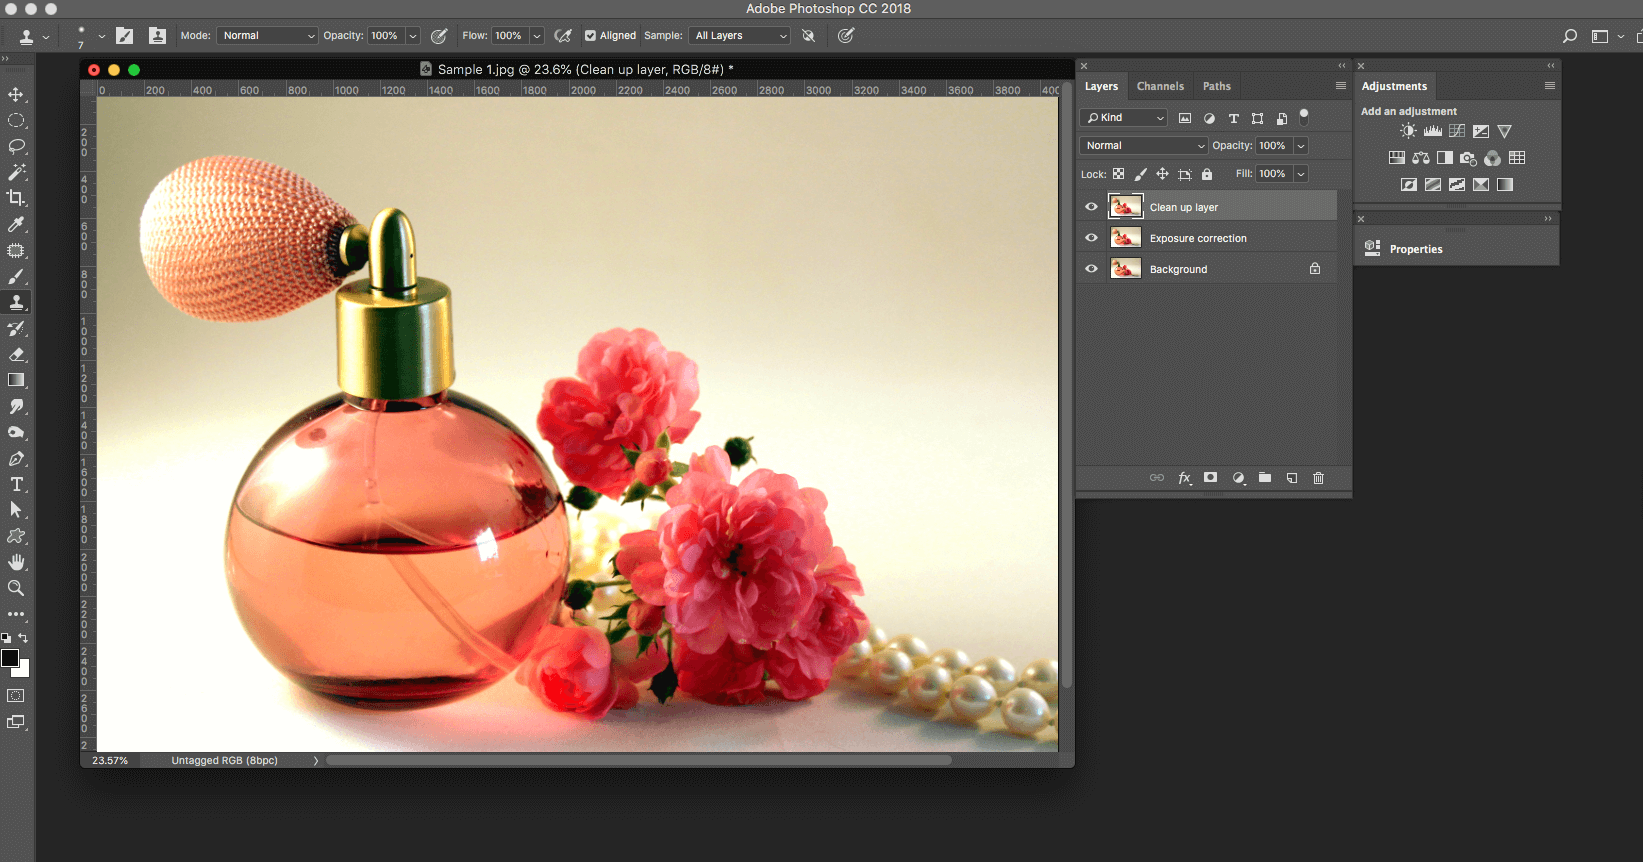
- The image needs to be zoomed in to identify flaws, spots, and marks
- The Clone Stamp tool chosen earlier is to be applied now
- The area adjacent to the mark to be removed should be selected
- Press down the Opt or Alt Key for selecting the image area to be cleaned
- Position the cursor over the mark/ speck to be removed
- Press the tool down for cloning out the area
- Repeat the process for every flaw
6) Applying Quick Mask
- Some surfaces which experience more light reflection can have marks that are hard to eliminate
- Hold down Q on the keyboard or switch to Quick Mask mode
- For masking background, choose the Brush tool and keep Opacity to 100%
- Paint the entire area where marks are present
- Choose eraser Tool for error correction
- Again, press Q for previewing the area selected
- Cut the masked area out by navigating to ‘Layer via Copy’ option under New in Layer menu
7) Eliminating Subtle Dust Particles
- Select the masked cutout
- Navigate to Median under Noise in Filter submenu of Layer menu
- Choose Radius to be 8px and go about blurring the pixels
- The layer opacity has to be adjusted at about 80%
- The layer needs to be edited initially by Darken blending mode followed by Linear Dodge
- The overall opacity of the layer can be reduced if required
8) Color replacement
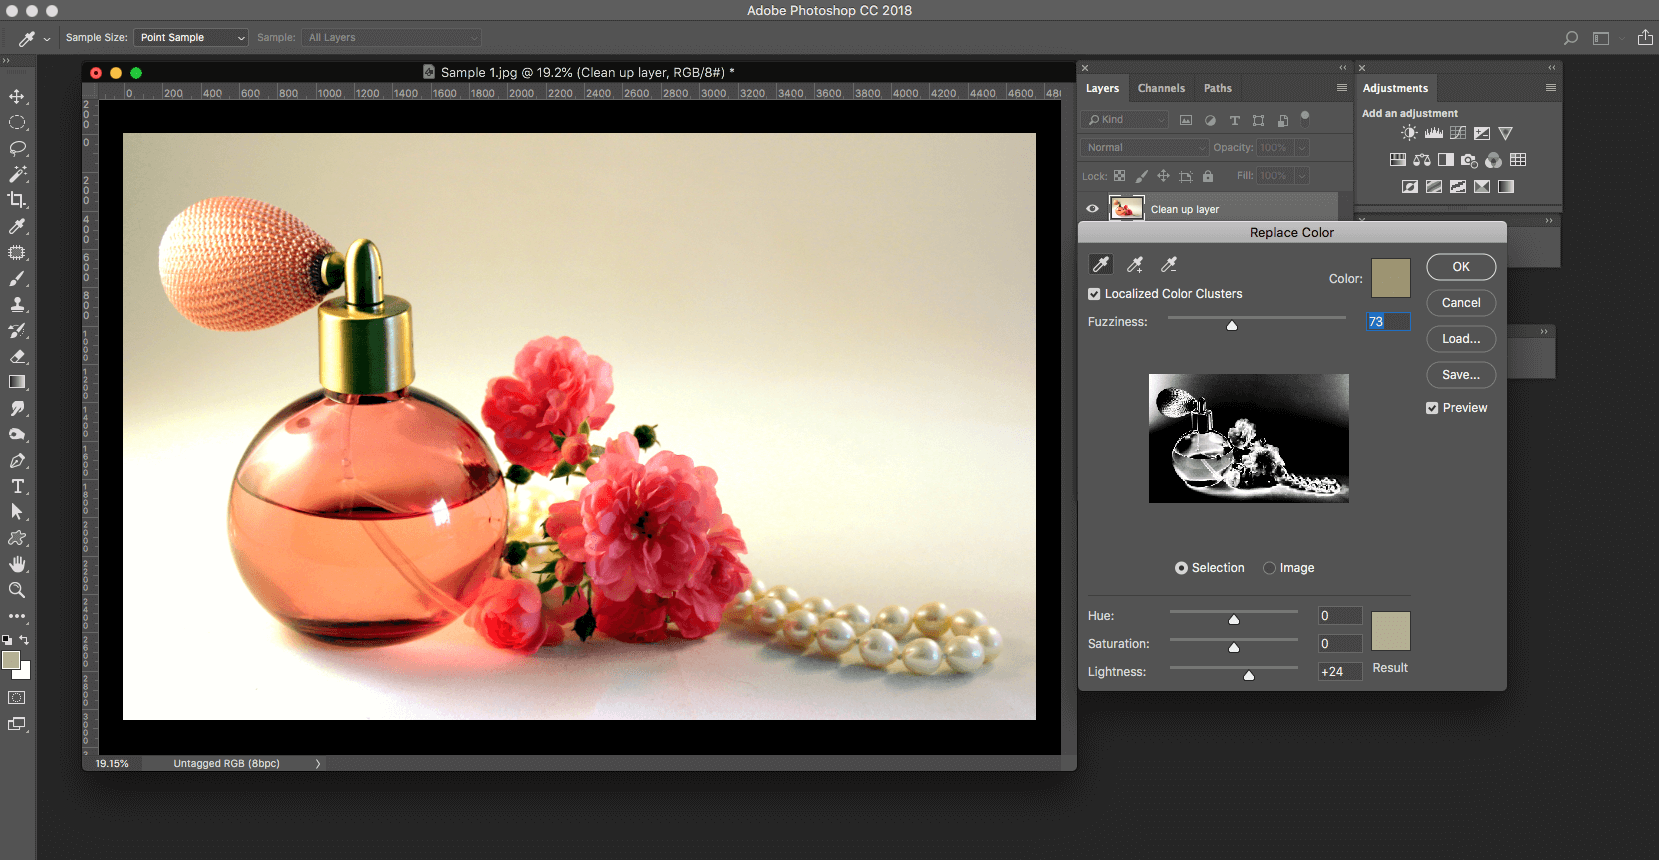
- The background color needs to be evened out
- Choose Replace Color under Adjustments in the Image menu
- Select the Eyedropper Tool and click on background region which is darkest
- The Lightness slider needs to be dragged up for brightening out the dark area
- This would also create a white background with an even spread
- By zooming in the product image, analyze if the white hue has blended seamlessly with the already present background color
9) Correcting The Color
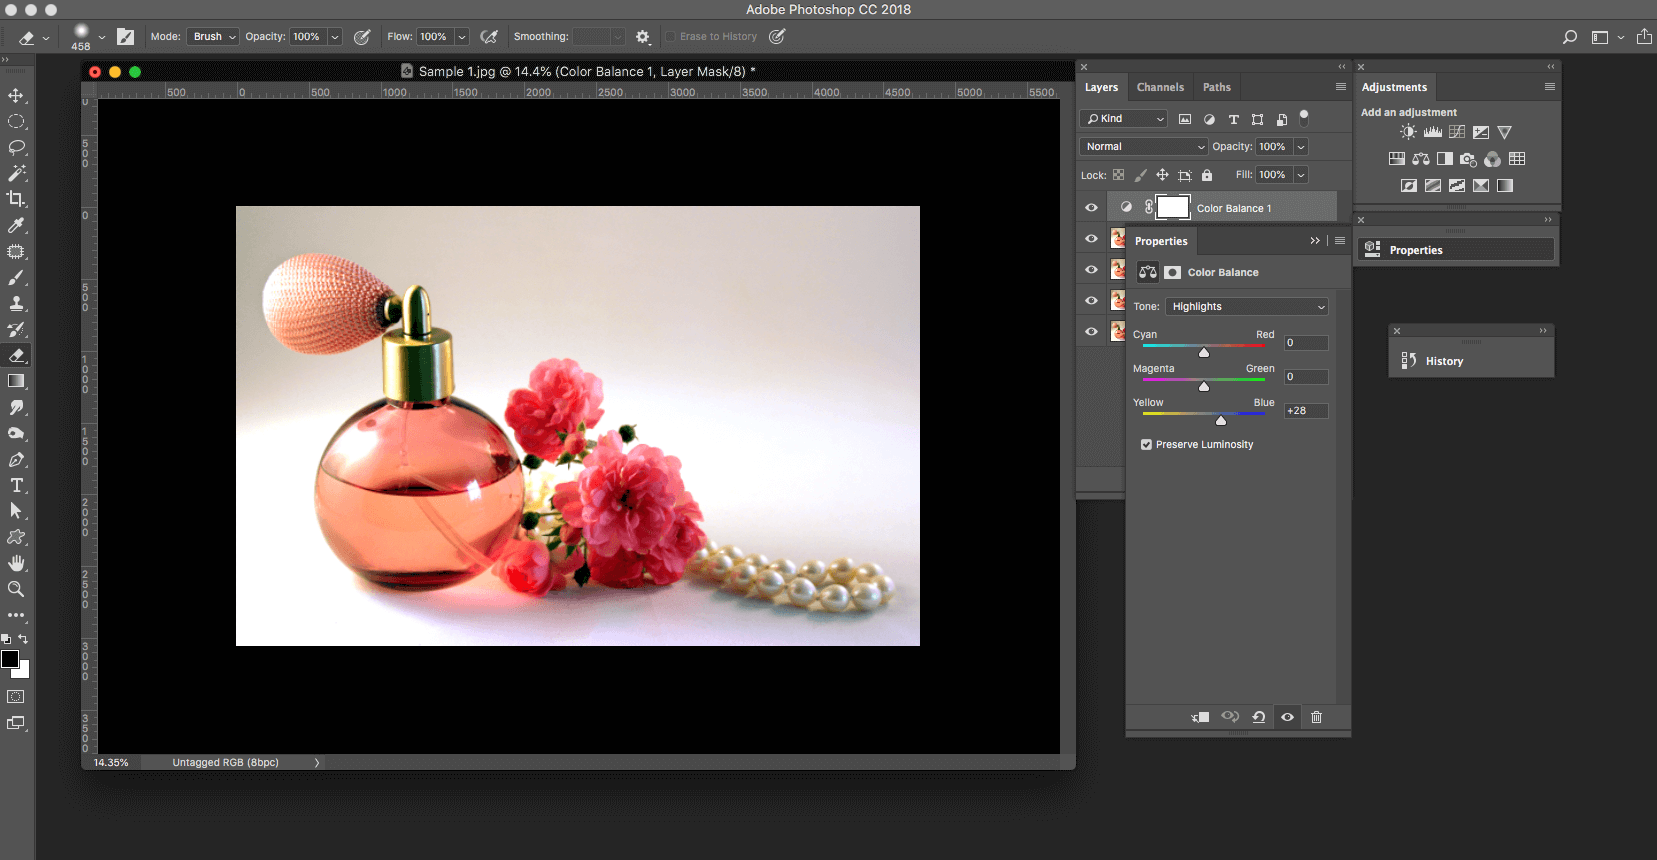
- Navigate to Color Balance under Adjustments in Image menu
- The warm tones of the product image have to be removed now
- This would facilitate the blues to be more visible
- Color Balance adjustment layer would facilitate this
- The ‘Preserve Luminosity’ needs to be enabled
- Move the sliders of Highlights, Midtones and Shadows for proper adjustment
- Keep checking the new results being obtained by pressing the Preview button
- You need not manipulate all the options; just slide the ones that give attractive results
10) Concluding Image Touchup
- Start by zooming in the image to identify eyesores that are still present
- For diluting warmer tones further, you may opt again for Replace Color adjustment followed by selecting a light blue region (or what may seem better)
- Move the Lightness slider slowly to clone out the unwarranted specks
11) Adjusting Image Contrast and Flattening It Up
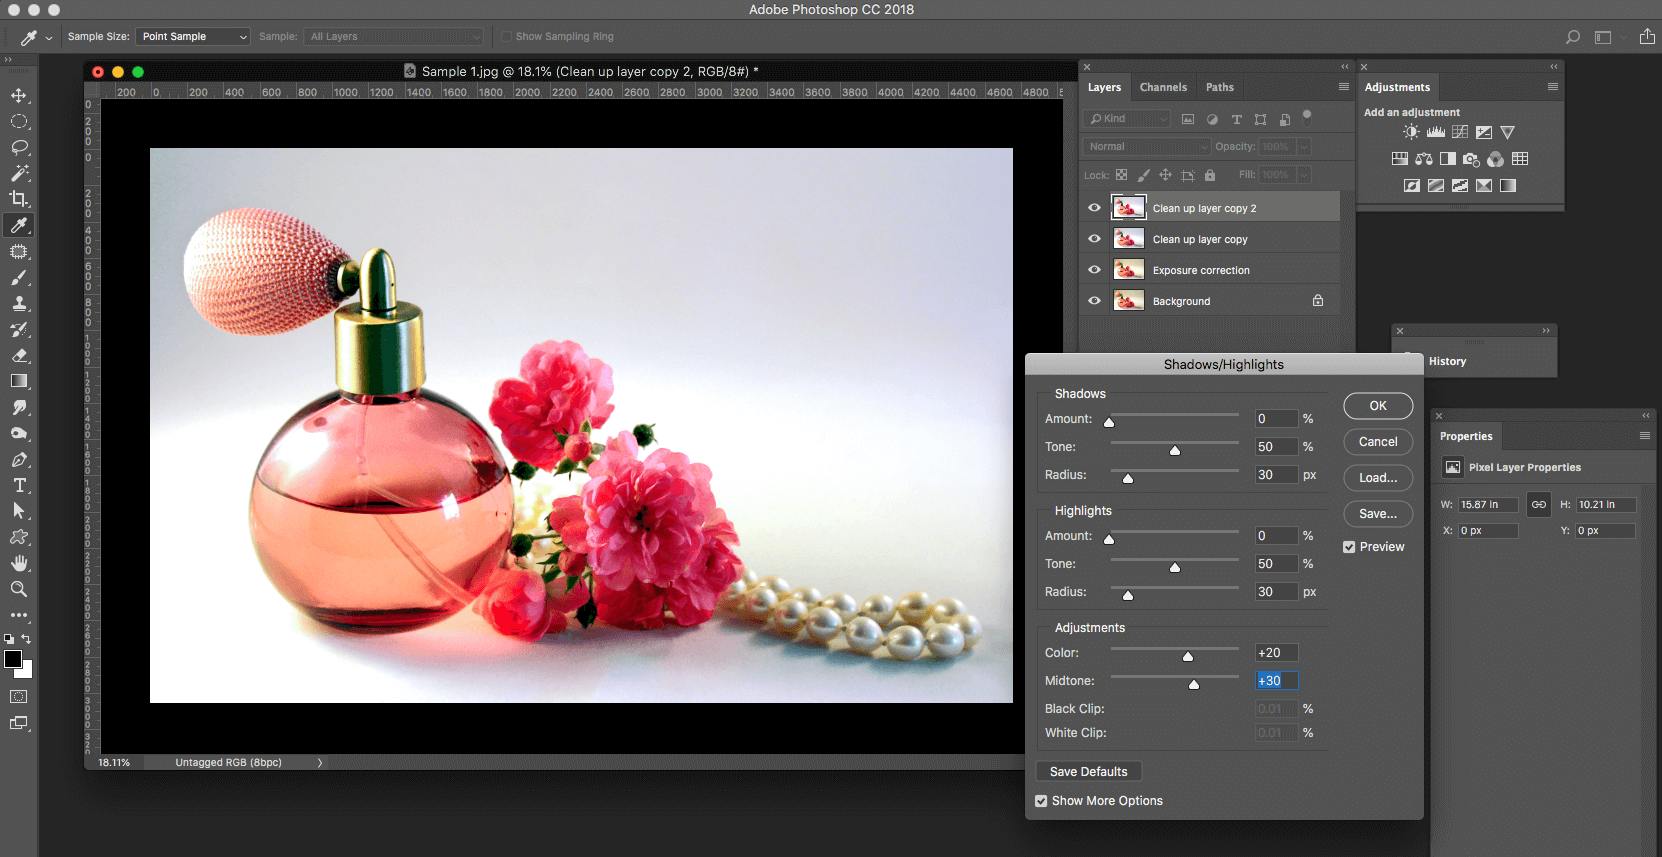
- Navigate to the Shadows/Highlights adjustment layer
- Move the Midtone Contrast slider till the desired contrast is before your eyes
- This file layer is to be saved as a .psd file for future editing
- Navigate to Flatten Image under Layer menu for flattening the final image layers
12) Sharpening Up the Image
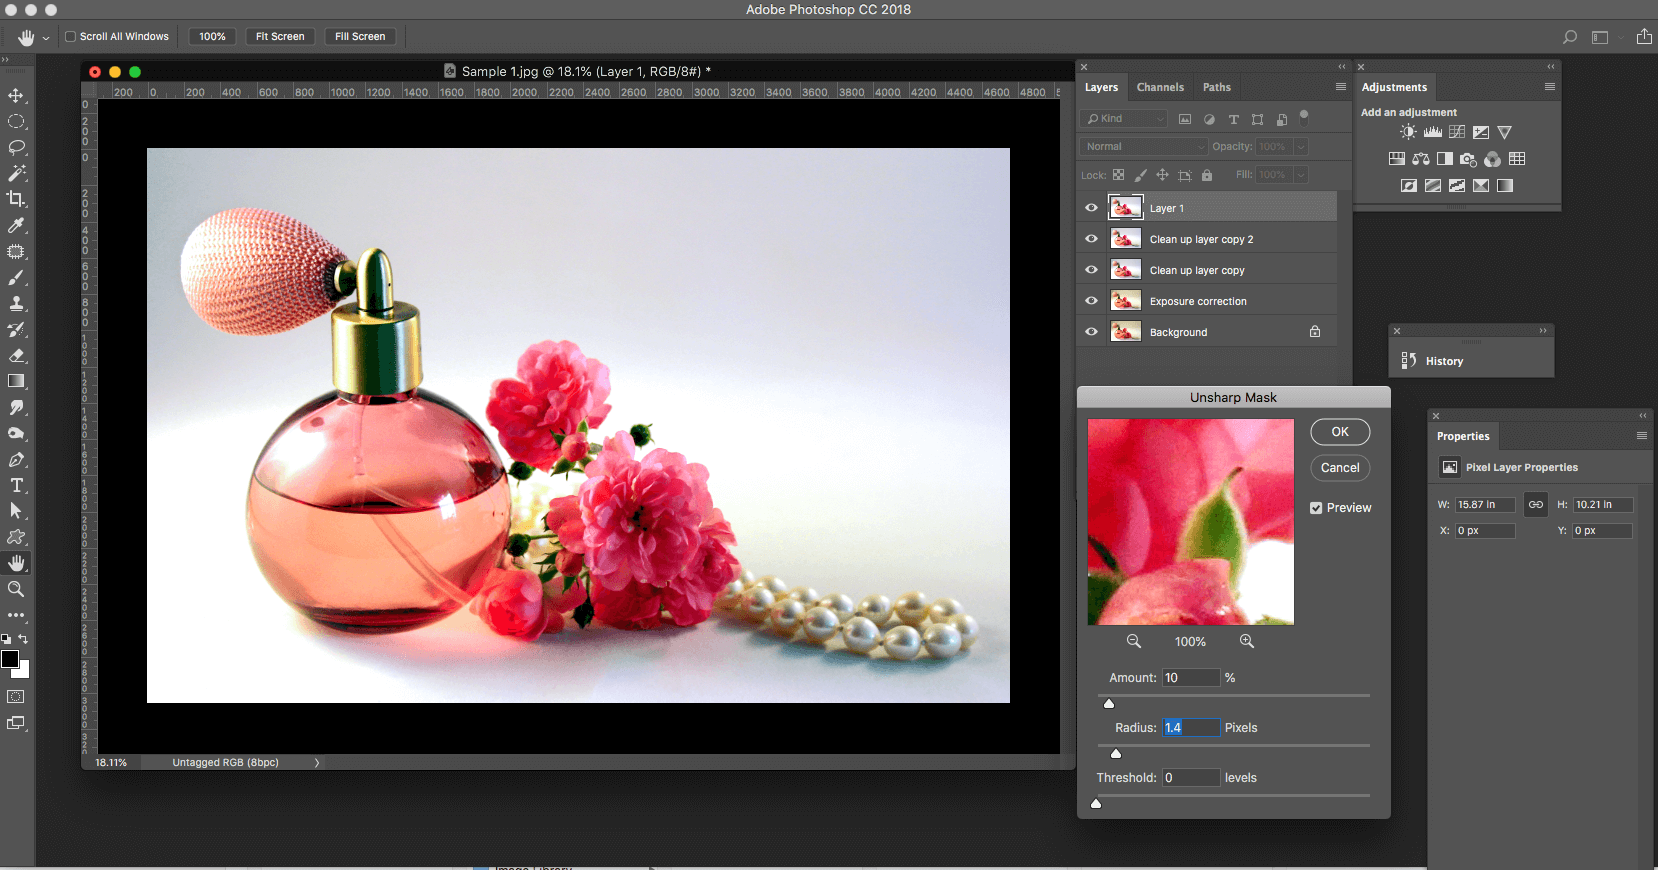
- Prior to saving the final product image, its sharpness quotient is to be ensured
- Overall quality and edge visibility should be professional
- Navigate to Unsharp Mask under Sharpen in Filter menu
- The mask amount is to be made 100% and Threshold level 0
- The Radius has to be slowly brought up to 2.6px or more
- Keep previewing the effects for best results
13) Image Resizing
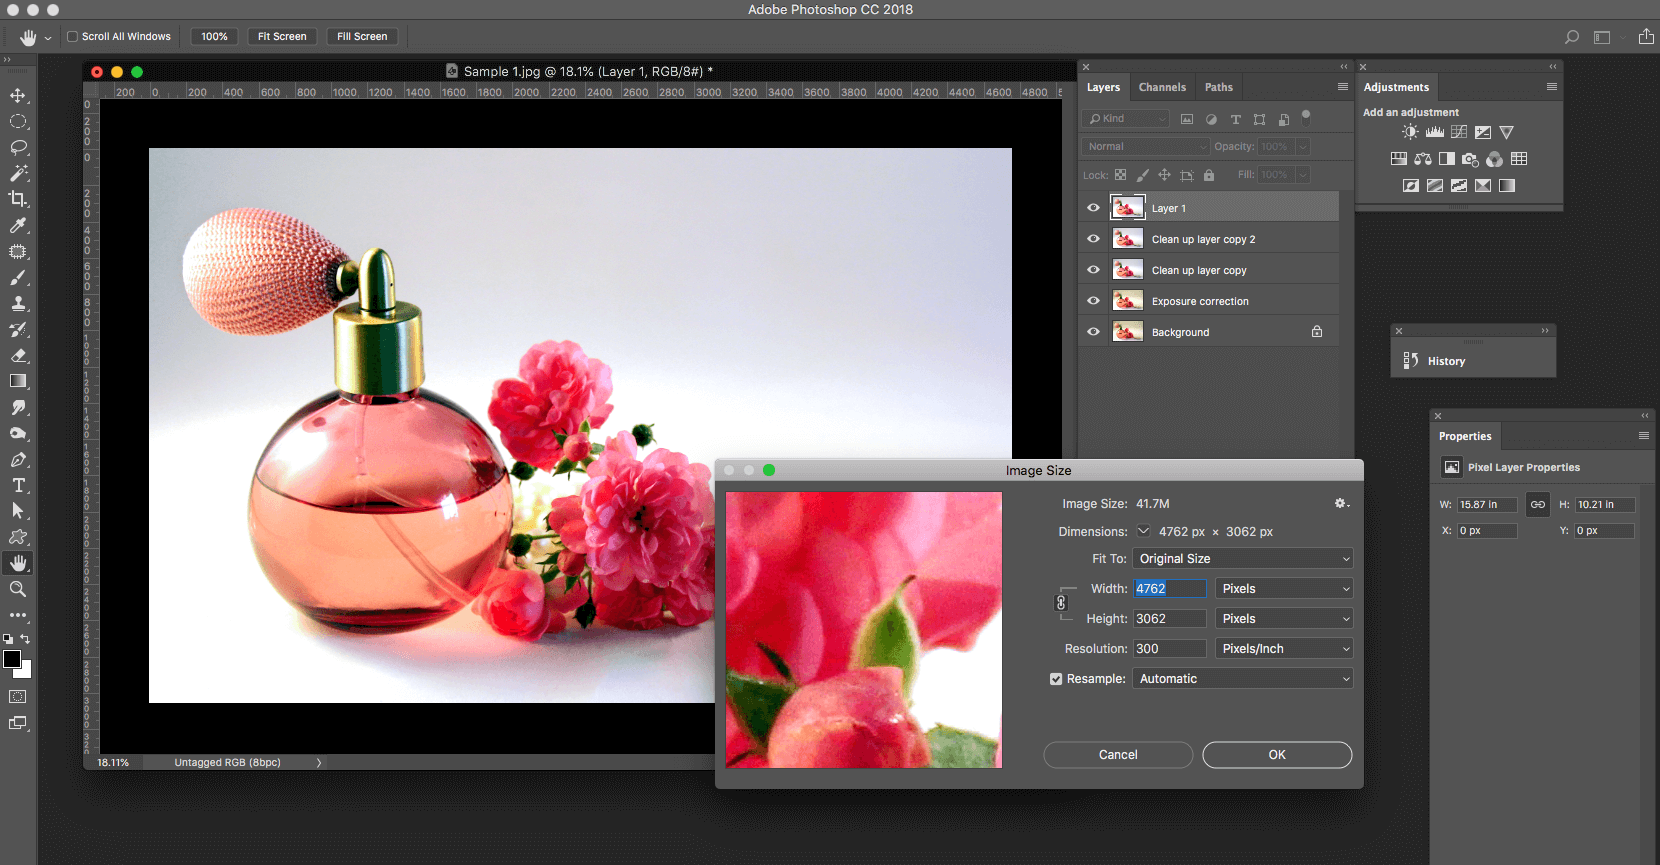
- Once all the product image related photoshop touch up have been carried out, image resizing needs to be done to render it web or printer friendly
- The image resolution needs to be 300DPI or more for best print results
- Navigate to Resolution under Image Size in the Image menu
- However, for website publication, the resolution needs to be lesser like 72DPI
14) Saving the retouched Product Image
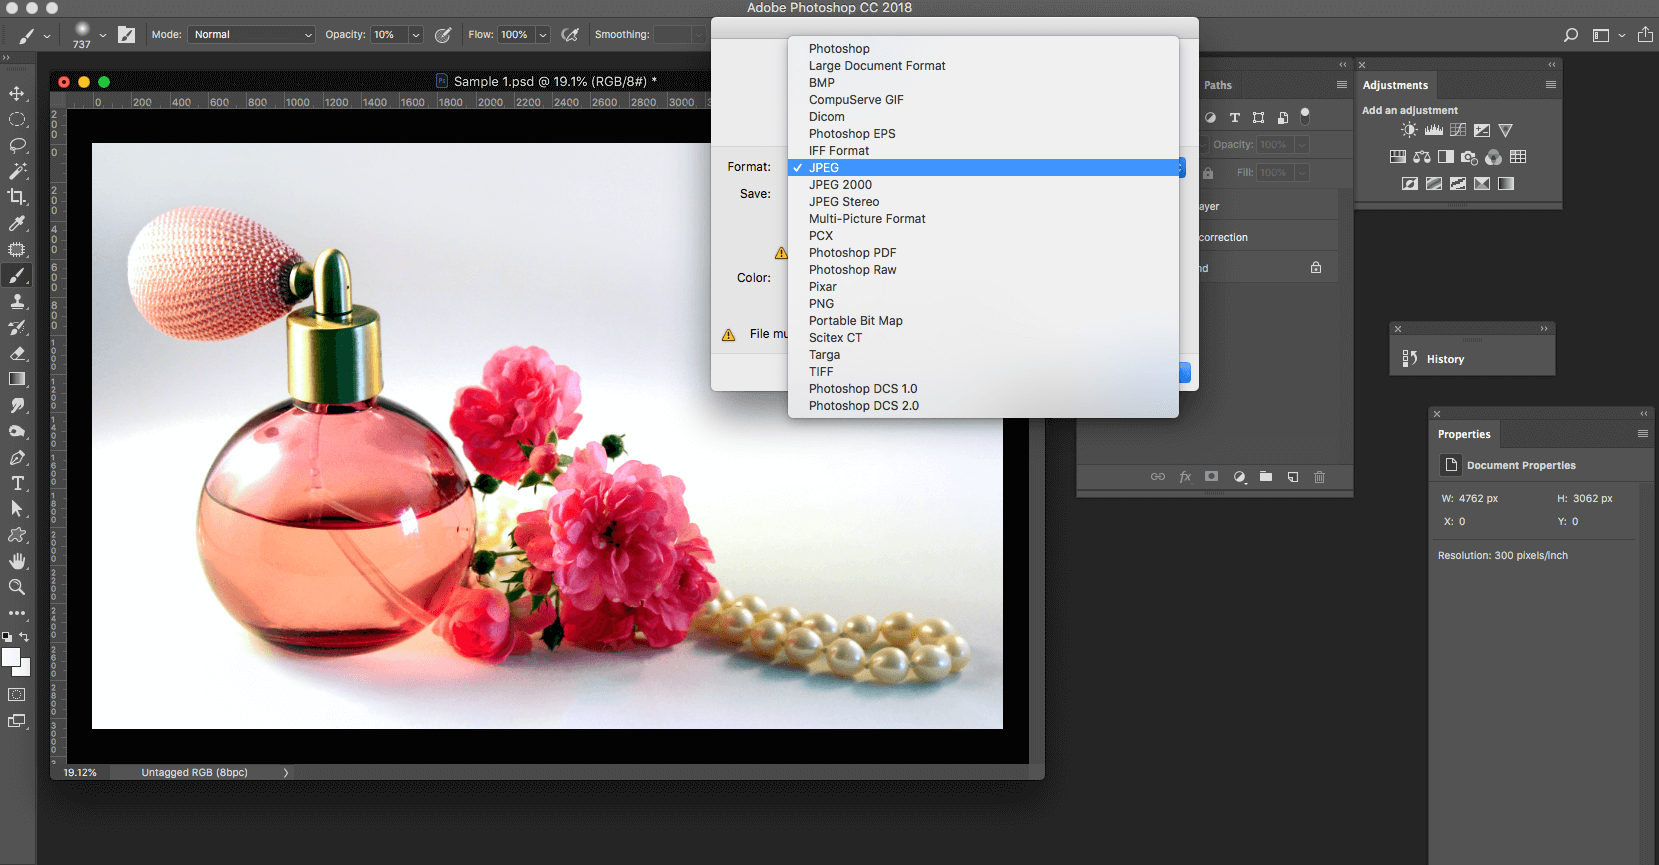
- To ensure that copyright protection is applied, watermark the images before use
- Once the correct image proportions and resolution have been achieved, it is time to save it
- Navigate to Save As under File menu and save the image in JPEG format
- Take the print out for brochures or get it uploaded to your site for catalog publishing
Other Options for Product Photo Retouching
There are two other options when it comes to product photo retouching. One is to hire the retouching professionals and second is to outsource the tasks to product photo editing services companies.
The first option of hiring skilled permanent or freelance retouchers is expensive. But if you are establishing a full-time venture for retouching, then hiring expert professionals can be feasible especially if you have plenty of services to complete.
Outsourcing product photo retouching requirements to reputed companies are affordable and the cost is much lesser. You can seek assistance from our company and benefit from the specialized image retouching services offered.
Useful Article:
- Outsource eCommerce Photo Editing – 9 Checklists Guide
- Guide to Photograph White Products on White Background
Final Words!
Retail image editing is an important application in the retail industry since the images need to be presented to a multitude of customers. There is a marked difference between the images of the products with and without retouching. You can spot the wide differences yourself; understand the perfection and quality of the retouched images.
Your brands can easily benefit from photo editing techniques. Using the best techniques, you can dynamically improve the presentation of your brands and kill competition. If your brands are highlighted through excellent images, clients will notice your products and prefer them over others. Photo editing techniques are already effective in improving retail sales and marketing.
As e-commerce stores are extensively applying these techniques, their products are marketed easily. So, plan to increase the image quality of your products and win over potential customers. You can introduce your products to new customers more effectively by presenting them the images that have been retouched.
Get ahead of other brands in the market! If you need expert assistance, PGBS is the name you can trust. We can provide end to end support for photography post processing and we have separate division of product photo editors who are trained to edit photos particularly for popular ecommerce platforms like Amazon, eBay, Etsy, and FlipKart. We will carefully cull the photos by selecting the best images which will attract the targeted audience.
Christa Elrod 


Christa Elrod serves as a senior graphic designer at ProGlobalBusinessSolutions. She is a creative designer with robust skills in typography, UI/UX designs, printing designs, video post-production, and 3D designs. Possessing years of experience across diverse industries, Christa loves to educate fellow designers with her experience and domain knowledge.