Photoshop selection tools are helping the artists, photographers, editors, and others in many ways and in this write-up, we will discuss various selection tools that you must be aware of and should have in your creative arsenal.
But how did this tool become so famous that it is the most common name when someone utters the word photo editing? The Photoshop selection tools can select, deselect, creates intersections, and also help you select a perfect region.
Before we discuss the different types of selection tools of Photoshop, first let us understand what it actually means.
What are selection tools, and how many are there in Photoshop?
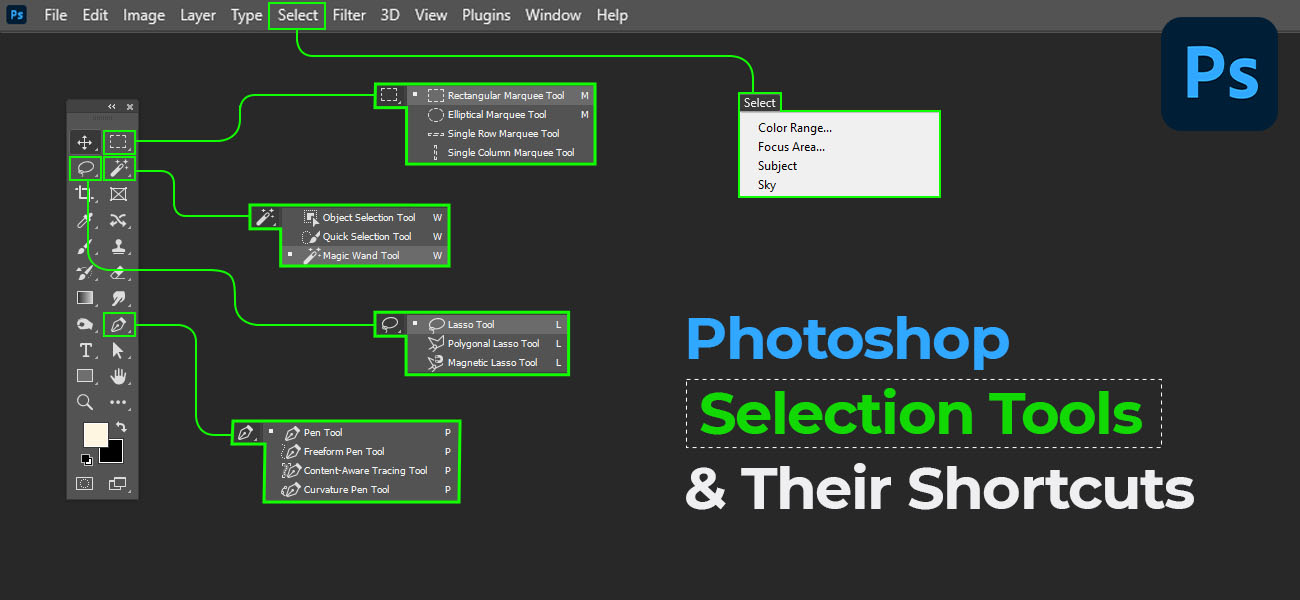
In Photoshop, there are nineteen types of selection tools, namely Rectangular Marquee tool, Elliptical Marquee tool, Single Row Marquee tool, Single Column Marquee tool, Lasso tool, Polygonal Lasso tool, Magnetic Lasso tool, Object Selection tool, Quick Selection tool, Magic Wand tool, Pen Tool, Freeform Pen tool, Curvature Pen tool, Magnetic Pen tool, Content Aware Tracing tool, Color Range, Focus Area, Subject, and Sky which are used to create an enclosed area within which the tools and effects can be used.
The selection tools are part of Photoshop’s tools found in the Photoshop toolbar and are used to select a particular portion of an image required for editing.
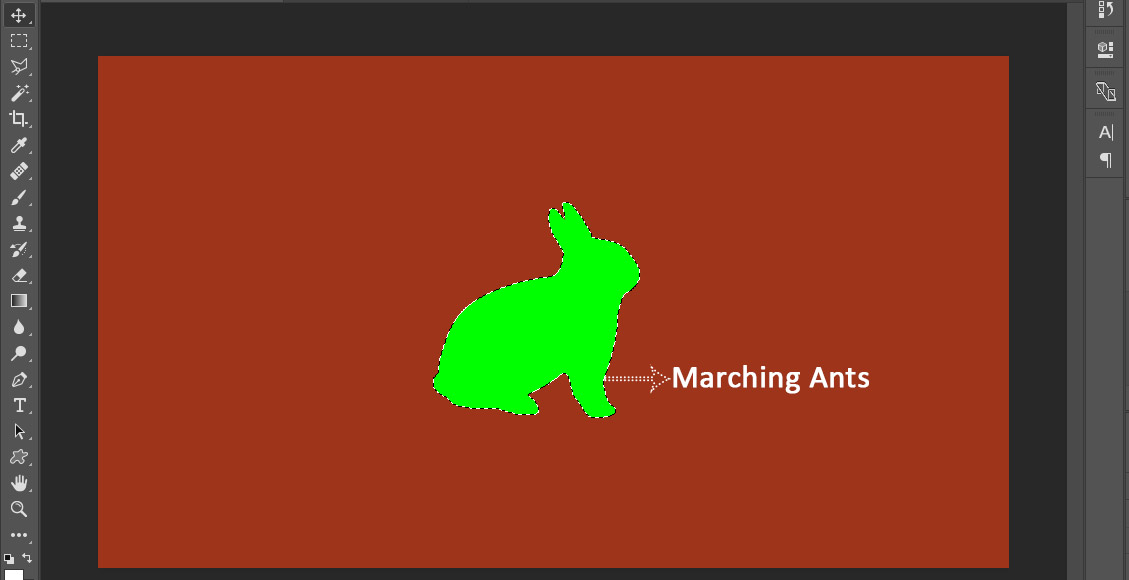
Denoted as dashed lines, also called ‘Marching Ants’, the selection area is very helpful in giving a different effect to a particular section leaving the rest in the natural state.
Now it’s time to discuss the 19 types of Adobe photoshop selection tools available in Photoshop and their usage.
19 Selection tools in Photoshop and their Usage
In order to select the desired object or background from an image, you can use any of these selection tools and select it according to your needs. Let us learn more about these tools in detail.
-
Marquee Tools
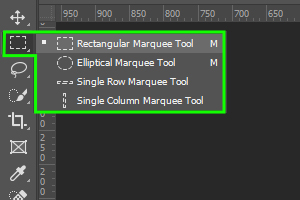 Marquee selection tool is a basic Photoshop tool that is used for simple and quick selections in different shapes. It helps in selecting layers of a photo to copy-paste objects from it, remove backgrounds, and edit certain areas of the photo without affecting the others.
There are four types of Marquee tools that you’ll find in the Tools panel:
- Rectangular marquee tool is used to select a rectangular part of an image. This default tool also has options to edit features like style and more. To get a square-shaped selection on an image, press shift while using this tool.
For the Rectangular Marquee Tool, the shortcut key is M - Elliptical marquee tool helps make selections in circles. To make a perfect circular selection, hold shift while selecting the area. To get a circle-shaped selection on an image, press shift while using this tool.
Hint: Press Alt to start selecting from the center of your click. - Single row marquee tool allows one-pixel-wide horizontal selection in Photoshop and helps creators’ do a little bit of cutting from the pictures.
- Single column marquee tool allows one-pixel-wide vertical selection and is similar to the one mentioned above.
The method for using these tools is very simple. Go to the Toolbar on the left side of Photoshop → select a rectangle-shaped icon → left-click or drag around the image area you want to select → start applying alterations by clicking Image > Adjustments.
For additional selection, click Add from the options bar, or just click shift and drag. To reduce the selection, press Subtract from the options, or click Option (Mac) or Alt (Windows) and drag.
To change the shape of the selection, click the marquee tool from the toolbar → select the type from the drop-down window.
Shortcut to modify selection: Press Shift + M.
You can also cut out images and shapes from a photo by holding and moving the mouse over the area you want as a separate image. Once done, you can copy the selection.
Shortcut to copy: Apple + C (Mac) or CTRL + C (Windows).
If you’re working on multiple layers, you’ll need to copy all of them.
Shortcut to copy all: Apple + Shift + C (Mac) or CTRL + Shift + C (Windows).
If you want to deselect or select again, just left-click or drag again. You also have options to undo selections at the end. Simply click Select → Deselect or use.
- Rectangular marquee tool is used to select a rectangular part of an image. This default tool also has options to edit features like style and more. To get a square-shaped selection on an image, press shift while using this tool.
-
Lasso Tools
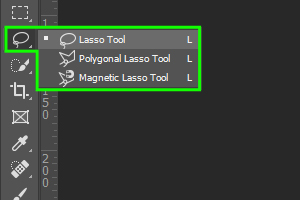
Lasso tools allow users to make free-hand selections, allowing them to simply drag and select a specific portion of an image in free-flow with no set shapes. You can select the this tool in Photoshop by selecting Lasso Tools in the Toolbox.
This one is considered to be the easiest tool of all the selection tools in Photoshop and here’s why: just click Lasso Tools to choose a starting point → move your cursor in the shape you want to select in an item → click once again where the angle changes. Repeat until you’ve completely outlined the whole shape.
Shortcut to Lasso tool is L. If you need to switch around other lasso tools like polygonal and magnetic you can use Shift + L.
- Standard Lasso Tool:
Standard Lasso Tool is considered a freehand drawing tool that helps in refining the selection in Photoshop. It’s used for four main services:- Step 1: Select a particular part or pixel from the picture to be edited.
- Step 2: Add more pixels to the selection.
- Step 3: Subtract unwanted pixels from the selection.
- Step 4: Select two loops that are intersecting.
- Polygonal Lasso Tool: This tool is used for a straight edge-based selection, as it provides a map sort of selection. Where your cursor moves, it creates pointers till you reach the starting point.
- Magnetic Lasso Tool: Magnetic Lasso Tool helps even beginners who don’t have a steady grip while creating a selection in the picture. While using this tool, it attaches small anchor-like pointers to the selection, making the selection process even easier for the editors.
Some additional options in this tool are:
- Width: Shows the distance between the cursor and the edge.
- Frequency: Controls the pointers drawn by the magnetic tool.
- Edge Contrast: Manages the contrast between pixels.
You can start with a new selection by selecting the New option from the Options bar. To add a new selection to an existing one, choose Add To option. Select Subtract From to remove a selection. To make an intersection with an already existing selection, click Intersect With.
If freehand selection is not your first choice, worry not! You can also try selecting straight-edged segments by pressing Option (Mac) or Alt (Windows) → click the needed starting and ending point of the segment.
Stop using the mouse without clicking Option or Alt to close the selection border. To delete your recent straight selections, keep pressing Delete.
Remember that deleting is different from deselecting. While the former is focused only on certain parts of a selection, the latter addresses undoing the entire process. To do it manually, you can go to the Select menu at the top → click Deselect. Or just click anywhere on the document with the Lasso tool because it’s that easy.
- Standard Lasso Tool:
-
Object Selection Tool
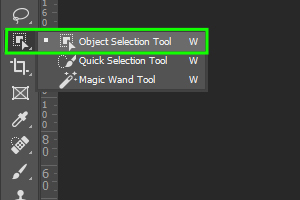
Object selection tool is an effective tool that allows manual or automatic selection of objects from a particular area in an image. However, note that it works best when the photo is clearly defined with the right amount of contrast.
You can find it in the Toolbox option, just above the Quick Selection Tool. If not, go to Edit under Toolbar → Customize Toolbar → find the tool in the Extra Tools section → drag it to the Toolbar on the left.
Steps to use: Find the Object Selection Tool in the Photoshop Toolbar → enable Object Finder in the Options bar present under the menu bar → choose either Rectangle (rectangle-shaped selection) or Lasso (freehand selection) for selection → click and drag around the region you want to select in rectangle mode or draw around the perimeter if it’s in Lasso mode → wait till the marching-ants or dotted line appear to have the selection complete.
Shortcut to use: Press “Shift+W” to use the object selection tool.
To edit object selection, press the gear icon in the Options bar and change the settings.
If it’s to remove the background, press Shift and select the images you want to retain → click Select > Inverse to have the background selected → press the lock on the right side of the image layer to unlock the image from the background → select the Eraser Tool and start removing the background.
To edit the selection, you can use the brush, pen, or refine brush tools to:
- Add areas by clicking the 2 solid square icon in the Options bar.
Shortcut: Press Shift (Mac) or Ctrl (Windows). - Remove areas by clicking the grey and white square in the Options bar.
Shortcut: Press Option (Mac) or Alt (Windows).
To further adjust your object selection, go to Select and Mask from the Options Bar and adjust the properties in the dialogue box.
To remove unwanted objects from the image, use the one-click Delete and Fill feature by pressing the following:
Shortcut to remove: Shift + Delete (Mac) or Shift + Backspace (Windows).
If the selection is not satisfactory, click Edit from the menu bar → choose Undo Object Selection to deselect with the object selection tool. Photoshop allows multiple undoes, so use it till you have your perfect selection on the screen.
- Add areas by clicking the 2 solid square icon in the Options bar.
-
Quick Selection Tool
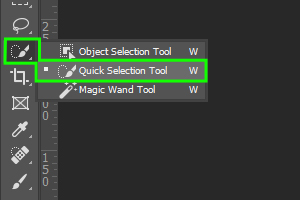
The Quick Selection tool in Photoshop helps you quickly select an area or an image and is the best choice for a broader selection. It’s very easy to find this tool in Photoshop because it’s right there on the tool panel (left side of your screen). It’s the fourth option below the lasso tool and looks like a paintbrush painting a square-shaped dotted line at its tip.
Shortcut to call: W.
To select and adjust using the quick selection tool, here’s what you need to do: go to the Tool panel → select Quick selection tool → Options bar → add a checkmark to the Auto-Enhance option → select an area using Click and drag option → the tool automatically chooses the same shades and stops after finding the image edges.
Adding a selection using the quick selection tool will happen by default, so just use it normally. When it comes to reducing it, you have a method. Here are some simple ways to accomplish both.
Shortcut to add: Press Shift and paint.
Shortcut to subtract: Press Option (Mac) or Alt (Windows) and select the area you want to remove.
Quick selection tool in Adobe Photoshop helps you remove backgrounds smoothly. To manually select it, go to the Menubar → choose Help from Photoshop → click the Discover panel → select Remove background from the Browse > Quick Actions menu.
Unlike the magic wand tool, the quick selection tool has no option to adjust the numerical tolerance that helps increase or decrease the luminosity of a color. Anyway, you can try the trick of option-click. Use it with the tool on the image areas you never want to select. This will help teach the tool to be more accurate.
Another aspect to focus on for precise selection is the way to refine the edges of your selection in Photoshop. It’s only a click away, as you just have to use the “refine edge” button and make the changes. You can also use anti-aliasing to soften the transition of colors in the edges and background. This feathering technique will help soften the edges in Photoshop.
You have to edit your brush size, hardness, and roundness to sharpen the quick selection tool in Photoshop. So, go to Brush options → adjust the configurations for accurate selection.
Shortcut to adjust the brush: Click Command + Option + Click (Mac) or Ctrl + Alt + Right-click (Windows), and move your mouse up to soften the brush and down to harden it.
For more accuracy, you can also adjust the size of your cursor.
Shortcut for small cursor: Press “[” key
Shortcut for big cursor: Press “]” key
If you want to rotate after quick selection in Adobe Photoshop, then follow these steps. Select the layer to edit → click Transform > Edit → select Rotate. Click and drag the image’s corners to rotate. Press “Enter” to fix the changes.
Shortcut to transform: “Command + T (Mac)” or “Ctrl + T (Windows)”.
Also note that you can resize the quick selection in Photoshop. Finish your selection → take the mouse to its edge to get the Resize cursor → click and drag in and out to make it smaller or bigger. Or click Edit > Free Transform from the menu → use the box around the selection to resize.
If the quick selection tool in Photoshop is not working, you must follow a few steps to resolve the issue. Enable the tool in the toolbar → click the icon to try using the tool if it isn’t there → If it does not work, try to reset the tool’s options.
Do not panic if your quick selection tool is missing from the toolbar. First, select Edit>Toolbar → Customize Toolbar dialog → check Extra tool list present in the right column, and drag it to the toolbar list.
If deleting a selection in Photoshop using the quick selection tool is what you’re stuck with, then here’s the process: select the right layer where the selection you need to delete is → pick the Eraser tool from the Tools panel → drag it over the area you want to erase.
Useful Links:
Complete Guide on Using Photoshop Quick Selection Tool
Change Background Color in Photoshop in Simple 2 Ways -
Magic Wand Tool
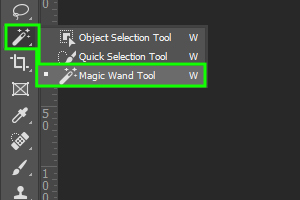
Magic wand tool is a tool in Photoshop that helps to make selections based on color. Choose any shade in the picture; this tool will automatically identify similar colors. As the name suggests, it uses machine learning to try and automatically select the object you click. Magic isn’t?
Where can you get this tool? It’s right on the toolbar. Sometimes, when you can’t find the tool, don’t worry. Try clicking the quick selection tool, and you’ll have the magic wand tool inside it.
Shortcut to open: W.
Here’s how you can select with this tool: go to the Toolbar → select the Magic wand tool → make sure the layer you want to select is active → click where you want a new selection → a new selection will appear.
To eliminate a selection, go to the Optionbar → click Subtract to remove areas from the selection.
If you have not selected properly, you can deselect using the following alternative method.
To alter your current selection, that is, to select the unselected part and unselect the selected part, go for the invert option. Right-click on your selection → click Invert option. This is best applicable for objects present with a solid color as their background.
Shortcut for invert: Command + Shift + I (Mac) or Ctrl + Shift + I (Windows).
You can use the Tolerance option present in the top panel, as this helps control the number of similar tones selected in a selection. The higher the tolerance level, the more colors will be present in a selection. With the default value of 25, this option can be extended up to 255.
To use it, deselect the existing selection → adjust Tolerance configuration → start selecting again.
Useful Link: How To Remove Image Background with Photoshop Magic Wand Tool
-
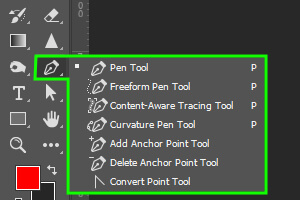
Pen Tools
 Pen tools, unlike other tools, allow free-hand selection of objects through anchor points. These also help convert the selections into vector shapes. Though this process requires more focus, time, and patience, the results will all be worth it.
Here are the 6 types of pen tools that you can use:
- Standard Pen Tool: It’s the general type of pen tool that allows manual selection and creation of customized shapes, straight segments, and curves.
- Freeform Pen Tool: This is a hand-drawing tool that can be used like the pencil tool. However, it’s not the right choice for selecting curves and segments precisely.
- Curvature Pen Tool: Aids in precise selection, especially when dealing with curves. As you lay down your selection path, this tool will automatically place curves between them.
- Magnetic Pen Tool: You can use this tool to draw around the edges and borders of the object you want to select. Though it’s not recommended for enlarged photos and accurate selection, it still works wonders for inked borders. You can find this under the Freeform Pen Tool .
- Content Aware Tracing Tool: Enable the Content Aware Tracing Tool and just move around the edges of the image you want to select. This tool will automatically create a clipping path by connecting the edges.
To use this tool, go to Preferences → Technology Previews → Enable Content Aware Tracing Tool → restart the application.
To edit the existing selection, use the following pen tools:
- Add Anchor Point Tool: This tool helps add a new part to the already-created selection path by just hovering over it. Press “+” to use this tool.
- Delete Anchor Point Tool: Use this tool to remove apart from the selection by clicking this tool and moving around the area that needs to be deleted. Press “-“ to use this tool.
To access these two tools, click Pen tool → choose Add/Delete Anchor Point.
Or use the shortcut: Hold Option (Mac) or Alt (Windows)
- Convert Anchor Point Tool: This tool helps convert corners to curves and vice-versa while creating a clipping path. Just click the Direct Selection Tool → select the anchor path that needs to be edited → click the point from the path to select it → press the Anchor Point Tool
Shortcut for converting using Anchor Point Tool: Shift + C
You can find these tools in the Toolbar. Start using them by selecting the appropriate tool and hovering over the borders or areas you need to select.
If some tools are missing from the pre-defined spots, click the three dots at the bottom of the toolbar to add the additional Pen Tool options.
Shortcut to access pen tools: Press P
To drag the anchor points or move the handles for editing your selection path, you can also press Command (Mac) or Ctrl (Windows).
-
Select
For quick and easy selections, you can also turn to the “Select’ tab in the menu bar on top. It is easy to find and open, and it lets you select parts of an image using four different criteria: color, focus, subject of the image, and the sky. Depending on the chosen criteria, you can be as broad or as specific in your selections.
Shortcut to use: Press Option (Mac) or Alt (Windows) and then press S.
How to use: After you click on “Select” with your mouse (or use the shortcut just mentioned), you will get a dropdown. Go down the list in the dropdown till you come across a section with these options listed in this order: color range, focus area, subject, and sky.
Let’s dig deeper.
Color range lets you select parts of an image or an already existing selection based on a particular color. You can use this tool when you want to change, adjust, or completely remove the color. For example, go from a white background to a gray or transparent background.
This selection tool comes with a dialog box that you can open by clicking Color Range on the dropdown. By default, the mouse pointer will turn into an eyedropper when you move it away from the dialog box. This is the eyedropper tool that lets you sample or pick colors to use. Click on the color you want to remove or replace, and all parts of the image with this color will get outlined.
You could also use the dropdown next to the “Select” option in the dialog box to make your selection. The dropdown has a small list of colors like red, blue, yellow, cyan, etc., from which you can choose. Under the colors, you will also find other options like highlights, midtones, and shadows.
If you want to select only a person’s face or exposed skin for retouching, you can do so with the “Skin tones” option. You will find this listed in the Select dropdown below the exposure levels.
When you are happy with your selection, you can click OK.
Shortcut: In the open dropdown, use the arrow buttons to get to the color range. If you used the Alt key to open the dropdown, you will find that the “C” in “Color range” is underlined. Press “C” to open the Color Range dialog box.
Focus area lets you choose areas of your image that are in focus. By default, this selection tool leaves out the blurry parts of the image, but you can make it consider more or less of the image by changing the degree of focus.
Upon opening the focus area dialog box, you will find a focus range slider that lets you adjust the selection areas. If you move the slider to “0” on the extreme left, the full image will be selected. Moving it to the opposite side (extreme right) will make the tool select only the clearest parts of the image.
The selection won’t be completely accurate, but it will do most of the difficult work for you. You can adjust the selection even more using the brush tools and add or remove selected areas.
Once all the areas you wanted to select are included in the selection outlines, click on Ok to confirm. And by default, the tool will select these areas.
Useful tip: Sometimes, your selection can have jagged and rough edges. You can soften them up by selecting the Soften Edge option or fine-tuning them with Select and Mask.
Shortcut: In the open dropdown, use the arrow buttons until you reach Focus area. If you used the Alt key to open the dropdown, you will find that the “u” in “Focus area” is underlined. Press “U” to open the Color range dialog box.
Subject will automatically find the main subject of your image (which is usually the most prominent thing in an image) and draw a selection marching ant around it.
Sometimes parts of the subject get ignored, or parts of the background get included in the selection. This happens when the software can’t tell which parts belong to the subject and which belong to the background. When this happens, you must fine-tune the selection so that the correct areas are outlined by the tool.
Note: This tool will work even if you have more than one subject. Isn’t that amazing?!
Shortcut: Not available. You can use the feature by navigating to Select > Subject from the top menu.
Update: Since the Photoshop 21.2 edition (June 2020 release), Select Subject is content-aware and applies new custom algorithms to detect people in the image. Treatment around the hair has vastly improved for a more detailed selection of hair. You can temporarily turn off content awareness by pressing and holding the Shift key while performing Select Subject.
Sky option will detect the sky and mark the sky area alone in your image. It is a great option for sky replacement editing or if you just want to remove the sky from your image. This option will only let you select the sky. There is no dialog box for further action.
Shortcut: Not available. You can use the feature by navigating to Select > Sky from the top menu.
Keyboard shortcuts for inverse, deselect, undo and redo selection tools (marching ants)
- Keyboard shortcuts to deselect the marching ant’s selection tool: “⌘ Command + D (Mac)” or “Ctrl + D (Windows)”.
- Keyboard shortcuts to undo the marching ant’s selection tool: “Ctrl+Z (Windows) or ⌘ Command+Z (Mac)”.
- Keyboard shortcuts to redo the marching ant’s selection tool: “Shift+Ctrl+Z (Windows) or Shift+⌘ Command+Z (Mac)”.
- Keyboard shortcuts to inverse marching ant’s selection tool: “Shift + ⌘ Command + I (Mac) or Shift + Ctrl + I (Windows)”.
Useful Tip
Selection tools in Photoshop are generally found on the left side of the Tools panel. If you can’t find the selection tools on the left side, go to Edit > Toolbar. A dialogue box with toolbar customization options will appear. Select the missing tools from the notice box’s right side to the left side and click the “done” button.
Use the right selection tools to level up your editing
Photoshop is a dynamic tool that has become an eminent part of the editing industry and is benefitting both photo editors as well as photo editing service providers.
This sums up the topic of Photoshop Selection tools and we hope our knowledge sharing has helped in clearing the topic to you quite well!
Christa Elrod 


Christa Elrod serves as a senior graphic designer at ProGlobalBusinessSolutions. She is a creative designer with robust skills in typography, UI/UX designs, printing designs, video post-production, and 3D designs. Possessing years of experience across diverse industries, Christa loves to educate fellow designers with her experience and domain knowledge.